Tiger is a peer-to-peer marketplace platform, it can for example be used for renting, selling, offering services or even giving things away for free. With the help of order types, you can create a marketplace type that suits your needs.
You can choose to accept online payments or only facilitate the contact. The person who sets up the marketplace will be the admin of the marketplace and he can choose to let everyone or a select few create listings on the marketplace.
Tiger can therefore be used for example as customer-to-customer (C2C), vendors-to-vendors (B2B) or vendors-to-users (B2C). It all depends on the idea that you have.
T You are also welcome to start a trial to find out for yourself what Tiger is and what we can do for you! Please refer to the link to try https://admin.happytiger.co
What are the marketplace types we support?
Tiger is quite special as we do not support only one marketplace type but different ones and these can be combined in one and the same marketplace.
On our feature page we mention renting, selling and booking services as possibilities, which are the most common used marketplace types but these are not the only ones.
For marketplace you can also for example have requesting, giving away (free), posting announcements or something completely custom. You can have any marketplace type you wish as long as it is supported by our order flow – the buyer pays the seller, or there is no monetary transaction.
On Tiger could even have more than one order type if you wanted. When you sign up for your trial you need to choose only one but can change this later from your admin panel.
Where can I learn about Tiger and creating a Tiger marketplace?
The best way to learn more about Tiger is to create a free trial. You can start the trial from our homepage by clicking the “Get started” button. In a couple of minutes you have your very own marketplace!
During the trial you can test all the features and settings we offer except using your own domain and your own email address.
If you wish to see some examples of marketplaces you can go to our success stories page from where you have access to three of our marketplaces. If you visit, please respect their privacy.
Interested in the features we offer? On our feature page we have collected our some of our main features. In our help center you can find out more information about them as well as other features we offer. However the only way to see all our features is to create a trial and experience them yourself.
Can Tiger be used for more than one type of marketplace, for example both selling and renting?
Yes you can use Tiger for more than one type of marketplace. You can for example have renting and requesting the same marketplace. On the marketplace these different types are called “order types” and you can edit them as needed.
When you sign up to a trial you need to choose one marketplace type but once you are on your marketplace you can go to “order types” in your admin panel to add or change the order type(s) in use.
Can Tiger be used as a multi vendor marketplace?
Yes you can use Tiger as a multi vendor marketplace.Tiger was created to be used with multiple providers. You can have a marketplace where all users have the ability to create listings or you can restrict the ability to create listings to the users of your choice.
Each user creates their own listings and take care of their own transactions and customer contact.
If a user has open listings they will be displayed on their profile that works like a storefront. The user can also add a display name if they want to use a different one from their name.
Tiger- Setting up your Marketplace
First steps after signing up
What is the Get Started Guide?
The Get Started Guide is the page that meets you every time you go to your admin panel.
The guide includes steps that will kickstart your marketplace journey and should be done when you have created your marketplace. By doing them you get an understanding of how things work and what you can do with your marketplace.
When you click on a step you will come to a page that explains what it is and from there you can go to the page that allows you to do the changes. – All of these steps can be done from your admin panel.
The guide is only a guide and not something you have to do or complete in order, you can do the steps you like, in the order you like.
The different steps for slogan and description
Slogan & Description
Slogan and description are shown to all users who are not signed in, together with your cover image this is what greets new users to your site.
Slogan – A short text to quickly tell visitors what your marketplace is about.
Description – Tell about your value proposition, what you are providing.
This is a good time for you to be creative and in a few words tell what your marketplace concept is all about. Try to create a slogan that describes your concept and is still simple. The slogan is one of the first things a visitor see and can affect if they stay and browse or leave. Remember the slogan is seen by both potential buyers and sellers.
You can, of course, change this later and you definitely should if your marketplace concept changes.
You can access the Slogan & Description in “Basic Settings”.
Upload a Cover Photo
Cover photo – the image behind your Slogan & Description
The cover photo comes in two sizes, 1920x450px and 1920×96 px. The 1920x450px one is shown behind the Slogan and description that shows before a user signs in (the image above). The thinner one, the “Small cover photo” 1920x96px (shown below) shows after a user has signed in.
Check out this article if you are thinking about how to get a good looking cover photo, And this one if you are wondering where to find commercially free photos, where we have listed several sites.
If you have issues uploading an image, please try to wait a few minutes and refresh the page and if no image shows try again if there was a connection issue.
Note that even when you have uploaded an image correctly, it will show as “No file chosen”.
Add fields & filters
Fields are part of the listing. Filters are fields used in the search.
Fields are the sections you find in the listing, such as description, location or price. Some of these fields can be used as search filters. There are a few predetermined filters such as description, location and image. You can add additional fields. These fields can be a text field, a number, checkboxes, dropdown or a date.
Using a Field as a Filter is an option for some of the fields types (number, dropdown, checkbox and date). Filters are displayed on the homepage of your marketplaces and users can use them to narrow down their search.
Here you can read more about what Fields and Filters are, how to edit them and a few examples.
Set up online payments (or disable them)
With this step you will set up online payments or learn how to disable it.
If you want to allow your users to pay and accept payments online, you will have to enable payments.
You can enable payments by adding your PayPal account or Stripe to the “Payments page in your admin panel. Here you can learn more about Stripe and setting up Stripeand here about PayPal and setting up PayPal.
In this article you can see how to disable payments for your marketplace or create a free order type (no online transactions).
Post a listing
Post your first listing to your site!
To post a listing, click the big button in the upper right corner of the marketplace with the text “Post a new listing”. Fill in some or all of the fields and when done click “Save listing”, and you have created your very first listing!
Invite users
To have a thriving marketplace you need users. This step is an easy way to invite users. If you feel you are not ready to invite anyone yet you can skip the step for now. Alternatively, you can invite yourself with another email address.
What to do after the basic setup of your marketplace?
Choose the color scheme
Choosing a matching color scheme makes your marketplace look a lot more like yours.
Change or add language
Did you know you can change or add another language for your marketplace? Tiger supports over 10 languages and a few more that are available upon request.
Can my marketplace have multiple languages?
Yes. You can have your marketplace in as many languages as you wish as long as we support them.
Each marketplace has a default language. This language is shown to new users by default. The default language is the first one.
What languages does Tiger support?
Tiger currently has many complete translations. Most are done by volunteers.
Tiger is available in the following languages:
Chinese
Czech
Danish
Dutch
English
Finnish
French
German
Italian
Japanese
Korean
Norwegian
Polish
Portuguese
Russian
Spanish
Swedish
Thai
Turkish
Vietnamese
How to change, add or remove a language
Go to the “Basic details” tab of your Admin console. The first section “Enabled Languages” shows you the active language(s).
The first language in the list is the default language of your marketplace. You can add additional languages by clicking in the field and search for the language.
Remove a language by pressing the “x” next to it.
Configure the search functionality
You can configure your marketplace’s search to search based on keyword, location or both.
Where does the search find from?
Tiger’s keyword search finds from the following fields (in order of preference):
Listing title
Listing description
Text listing field contents
Category of the listing
Location of the listing (street name, zip code, city name)
First and last name of the user who posted the listing
Username of the person who posted the listing
How are the search results sorted?
When a user performs a search, we sort the results based on how relevant they are to that specific search term. We use our own algorithm to decide on relevancy. Listings that have the keyword in the title have more weight than listings that have it in the description, etc.
The search box is not meant to find only exact matches, instead, it’s more like “find listings that match at least partially and then sort by relevance”. Stricter search can be achieved via listing fields and filters.
How the "Map view" works
Initial zoom level
When using keyword search
When the map view loads, the initial zoom level is set to show all listings.
For example, if your marketplace only contains listings in a small area, the default zoom will show that area. But if your marketplace has listings from all around the continent, the zoom will be set to show the whole continent.
When using location search
When the map view loads, the initial zoom level is set to automatically show the correct searched area. The search knows whether you tried to search for a street name or a city, and adjusts the map zoom level correctly.
Map view, search and filters
If users look at the map view after a search or when using filters, only the listings which fit the criteria will be shown and the initial zoom level will be adjusted to show all the filtered listings.
How can I change the default text displayed in the search bar?
You can change this text from the “Admin panel” -> “Basic details” -> “Search help text” section.
Configure the top bar
You can configure the top bar and add links. Easily link your blog or forum to your marketplace by adding a link to them to the top navigation bar from admin panel -> top bar. You can also change the text of the “Post a new listing” button to reflect the type of listings you have in your marketplace.
Add listing categories
You can use the categories to create a hierarchical structure to your marketplace. Currently we allow two levels of categories: top level categories and subcategories. You can add new categories from admin panel -> listing categories.
Configure the order flow
You can configure your marketplace to support many different use cases, including product selling, rentals, or service booking. You could even have all these types in the same marketplace. This is done through order types.
What are order types?
Order types represent the different transaction types that your marketplace offers. They determine how the order process works on your marketplace. It can for example be renting, selling or giving.
You can decide whether your users are renting or selling, or perhaps just posting announcements and communicating via free messages. You can have as many order types as you like, which means that, for instance, you can have renting and selling in the same marketplace.
What order types can I have?
We offer a few predetermined order types but you can also create custom order types for practically anything.
The predetermined order types you can choose from are:
Selling products
Renting products
Offering services
Giving things away
Requesting
Posting announcements
You can rename the predetermined order types if you wish.
You can have one order type or several.
How order types are displayed to the seller
To the seller, the order types are called “listing types”.
The order types affect the seller’s experience when they post a new listing. When a seller creates a new listing they first choose which category they list in (if you have more than one category), and then which order type to be used. If you have enabled multiple order types for the category the seller chose, he or she needs to choose one of them when posting a new listing.
If you have enabled the price field the seller needs to add a price to their listing. If you have enabled online transactions the seller need to fill out their payment details to receive money.
How are the order types displayed on the main page?
On the main page of your marketplace, if you have enabled multiple order types in your site, user will see “All listing types” drop down in the browse view. This dropdown lets buyers filter the listings based on the order type.
If you are using the list view, you can display the order type / listing type next to the listing. You can do this from “Settings” in your admin panel under Listing preferences by selecting “Display listing type in list view”.
Can different categories have different order types?
Yes, you can choose which category an order type will be used.
By default a new order type created is used with all categories. You can change this from “Listing Categories” in the admin panel. To use an order type only with certain categories, you need to go and edit the category and deselect the order type in question.
Change pricing units
For the marketplace you can choose the pricing units of your choice. You can either use one of the existing ones or create a new one. You can even have an availability / booking calendar.
Update content pages
Your marketplace has four content pages: “About”, “How it works”, “Terms of Use” and “Privacy policy”. By default these pages are filled with standard templates. You should replace these templates with your own content. You can find the pages by selecting “About” from the top bar. You can edit each page directly in-place (there’s an “edit” link on top of each page).
Connect a custom domain and email from address
To make your marketplace completely “white label” and remove all Tiger branding, you can start using your own custom domain and set up a custom email address for sending the automatic notification emails. These features are currently available only to the subscribers of our Premium plan or above. If you wish to make your marketplace white label, just subscribe to our paid plan, and we’ll send you instructions on how to proceed.
Tiger- Look and Feel
Customizable footer
Style variations and templates and customizable footer
You can choose between four templates: dark, light, marketplace color and logo. Here is how they’ll look like.
Text links
You can add as many links as you want to the footer by clicking the “Add a new link to footer” link. They will be laid out in order in the live footer version. You can edit the order by using the arrows to the right of each link and remove links by clicking the “x” icon.
You can also add a translation for the link text for every language enabled in your marketplace. You can even add a different link URL to every language in case there are different language options in the target site.
Social media links
There are some predetermined social media logos that can be added to the footer. These are:
Facebook
Twitter
Instagram
YouTube
Google+
LinkedIn
Pinterest
SoundCloud
By default, they are all disabled, but you can enable as many of these as you want by clicking the checkbox next to the social media name. You can add your specific social media page’s URL, but you can also decide to add any URL, it is not limited to that specific social media. You can change the order of display by using the arrows to the right of each link.
At the moment it is not possible to have any other social media icons, but in the future, we might enable more.
Copyright text
You can add copyright text that will be displayed at the bottom of the footer.
How the Cover photo, Slogan and Description work
You can add a cover photo, a slogan, and a description that will be shown to all the users that visit your site for the first time. You should invest some time into making this section of your marketplace look attractive since it’s the first thing your new users will see. A good cover photo can make the difference between a new visitor joining or leaving your marketplace. The slogan and description help new visitors understand what your marketplace is about. They are the first thing visitors notice when they land on your site, so try to make them compact but descriptive.
Cover photo
You can add a cover photo by going to the Design tab of your admin panel. The cover photo is shown on the homepage for non-logged-in users. The image size should be 1920×450 pixels. If you use a photo with any other size, it will be resized automatically and taller images will be cut in the middle (top and bottom will be cropped). To enjoy the best results, you should use the recommended size.
The small cover photo
In addition to the big cover photo, you need to upload a small cover photo, 1920x96px. The small cover photo is shown to users who have signed in to your marketplace.
If you have issues uploading an image, please try to wait a few minutes and refresh the page and if no image shows try again if there was a connection issue.
Note that even when you have uploaded an image correctly, it will show as “No file chosen”.
Slogan and Description
The slogan and description are contained within the cover photo. You can add a slogan and a description by going to the “Basic Details” tab of your admin panel.
Can I change the color of the Slogan and Description?
Yes, you can! You can do it by going to the Design tab of your admin panel and setting a hex color value for each one of them. This site can help you select and copy the color value.
Is it possible to hide the slogan and description
Yes, it is! You can choose to show the slogan and description on your homepage or not. However, it is important to write a slogan and description, even if you choose to hide them. Why? Because this information will still be shown in social media, browsers, and search engines.
Why can’t I see my cover photo when I land on the site?
The cover photo is shown in the homepage only for non-logged-in users. If you are already logged in, you won’t be shown the cover photo. If you want to see how it looks, you can go to the design section of the admin panel and click on any of the links to “See how it looks”. Alternatively, you can log out of your marketplace.
How to change the layout, edit texts or add custom scripts in your Tiger marketplace
Administrators can add custom CSS or JavaScript to Tiger marketplaces. With this feature, you can customize the way your marketplace works or looks, and can add third-party scripts (such as the Google Search Console verification or a Facebook tracking pixel code).
Custom scripts are added to the <head> tag of each page in your marketplace.
Custom scripts are active on all pages, for all users (whether they are logged in or not). Custom scripts are not active in pages of the admin panel.
This feature can be dangerous and should only be used by administrators who know what they are doing. In a worst-case scenario, your marketplace might be unable to load and be unavailable for users. Some technical knowledge is required to write custom code.
NOTE: Modifications made with custom scripts might break with page layout changes. As custom scripts can modify any part of the page, we have no way to guarantee that it will continue to work when changes are made to Tiger . Keep this in mind and use this with caution.
Due to the reasons mentioned above, custom scripts should only be used carefully. If you’re trying to change the way Tiger works, we’re always listening to ideas, so contact us!
How to use Google Search Console (Webmaster Tools) with your marketplace
Add your website at Google Search Console
If you want to verify your marketplace using Google Search Console (GSC) (previously named Google Webmaster Tools or GWT), you can do it by adding Google’s verification code as a custom script to your marketplace.
Paste your script into the “Custom script” text box.
Click “Save settings”.
That’s it—our custom code is now active and set! Changes are applied immediately.
Custom script field size
The custom script field content is stored into a MySQL database in a TEXT field type. This means that the allowed size for this field is roughly 64 Kilobytes (or about 65,535 characters). This can vary a bit because of encoding though.
If you plan to add longer scripts, you should consider hosting them in a separate file on your own https server or file hosting.
What to do if your custom code breaks things
If the code you add produces errors, your marketplace may not work for users. If you are unable to fix the custom code, remove it to get things working again:
Log in your marketplace as an administrator.
Open the Admin panel.
Open the “Design” tab.
Remove all code from the “Custom script” text box.
Click “Save settings”.
Embed Youtube videos (and other providers) in static content pages
How to embed Youtube videos (and other providers) in static content pages
In a marketplace created with Tiger, you can edit up to four pages of content, to better describe your project and explain to your users how it works, what are your terms and privacy policy.
You can edit the content in these pages and even add pictures or videos.
Please note that this doesn’t apply to listings (learn more about this here) or emails (as this is restricted by most email providers, only to static content pages
Add a Youtube video in a content page
Unfortunately there is a known issue with Youtube videos and the text editor. We do our best to improve that feature.
Meanwhile, here is a workaround to add Youtube videos:
Log in your marketplace as an admin.
Go to the content page you want to edit.
Click the “Edit” link to load text editor.
In the toolbar, click on <>(“Edit the HTML content”) to load your content in HTML, a more technical view.
Go to the Youtube page of the video you’d like to embed.
Click “Share” then “Embed”.
Copy the code displayed (it starts with “<iframe…”). You can also change video size and other settings if you click “Show more”.
Go back to your content page with the HTML content displayed.
Look for the place where, among your text, you’d like to add your video. Add a new line.
Paste the code you copied from Youtube.
Click “Save and Replace”. Your video should be embedded.
You can center the video and/or add more content. When your content is OK, click “Save” in the upper left corner.
That’s it! Your Youtube video is now available on your content page!
Tiger- Users
How to modify the signup form and add fields to the User profile
Sometimes you need more information about your users for internal purposes or you might want to show more information in the user’s profile. It is possible by adding custom User Fields. You can ask for this information upon registration or simply make it available in the profile settings for users to fill whenever they want. You can also decide if you want to make this information public or keep it private for internal uses.
How to create and edit listing fileds
Create and edit listing fields
To create new listing fields, you should:
log in your marketplace as an administrator,
go to the admin panel,
open the “User fields” tab,
choose a field type from the “Add new field” dropdown or edit an existing one,
configure it and save.
The field will be created immediately.
You can create different types of user fields:
Text: users can add some free text in this field.
Number: users can add some numeric value in this field, you can decide to allow decimals or not and setup a minimum and maximum value.
Dropdown: users can select one value from a list you defined.
Checkbox group: users can select one or more values from a list you defined.
Date: users can add a date via this field.
Make the field mandatory when signing up
You can select whether or not to make the field mandatory when new members sign up. If you make it mandatory, it will show in the signup form and users need to fill it out (or select at least one option) when signing up to the platform. If you add a field to the signup form after some users have already signed up, this field will become a mandatory field to fill for a user when trying to update their profile information.
Show it in the public profile
You can choose whether or not to show the information on the field in the public profile of the user. If you do, everyone that visits the user’s profile would be able to see the information that the user provided (they are warned about this when signing up). If you don’t this information will only be visible to you, as an admin, when downloading the CSV file from the Users section of you admin panel.
Limitations
It is not possible to add a file type field. This will probably be developed in the future, but there is no timeline for it.
It is not possible to have a custom optional field in the sign up form. It needs to be mandatory, like all the other fields in the sign up form
How to add another user as admin
If you work on your project as a team, it is good to have many people with administrator privileges in your marketplace.
You can set someone as admin from the Manage users tab in your admin panel, by checking the Admin checkbox in front of their name and email.
How to set someone as administrator in a marketplace, in detail?
A few things to know first:
only an administrator can grant admin privileges to someone else,
the person who will be added as admin must have an active regular user account already (if the user doesn’t exist, you will not be able to set them as admin),
setting someone as administrator is effective immediately,
users are not notified so don’t forget to contact them to let them know.
To make a user an admin, in details, you should:
log in your marketplace with your own admin account,
go to your Admin panel,
go to the Manage users tab, from the left column in your Admin panel,
in the list, find the person you want to add as administrator,
click on the checkbox from the Admin column,
a quick notification Saving… then Saved will appear and the checkbox will be shown as selected,
that’s it! This user is now an administrator in your marketplace.
How to remove an administrator in a marketplace?
If you want to remove all admin privileges for a user, you should:
log in your marketplace with your own admin account,
go to your Admin panel,
go to the Manage users tab, from the left column in your Admin panel,
in the list, find the person you want to remove as administrator,
click on the checkbox from the Admin column so that it is no longer selected,
a quick notification Saving… then Saved will appear and the checkbox will no longer be shown selected,
that’s it! This user is now no longer an administrator in your marketplace.
How many people can be administrators in a marketplace?
You can have as many admins as you wish. However take care, it’s good to be careful when opening the gates of your marketplace and give administrators privileges only to people you trust!
Can there be different levels of admin privileges?
Some people would like to have only one admin and other accounts with certain, but not all, admin privileges. Unfortunately at the moment this is not possible. As said before, all admins have the same privileges.
How to edit the profile information on behalf of another user
Sometimes you would like to be able to help your users update their profile information. Other times you want to remove sensitive information from a user profile or improve the quality of the information provided, like adding an image when someone has forgotten to add one.
How to access the “Edit user profile” feature
You can access the “Edit profile” feature in two ways.
A) Via the shortcut in the Users table in your admin panel
Log in to your marketplace with an admin account
Go to the Users section in your admin panel
Find the user you want to edit
Click the pencil (Edit) icon on their row
B) Via the user profile
Browse the user profile
Click the “Edit profile” button in the “Admin actions” section
Editing the users’ profile
You can simply edit the user’s profile exactly as you would do your own. You will notice that there is a banner clearly indicating the name of the user whose profile you are modifying.
Don’t forget to click the save button at the end of the form to save the information.
That’s it!
How users can manage their email addresses
Tiger marketplace users can set multiple email addresses for their user account.
How to add a secondary email address
Log in to the marketplace.
Open your user settings panel (“Settings” from the dropdown under your photo/name).
Open the “Account” tab.
In the “Email addresses” section, click on “+ Add new email address”.
Add your second email address. Check “Receive notifications” if you want to receive notifications at this address.
Click “Save”.
Check your email inbox for instructions on how to confirm the address.
Follow the instructions. You will see the message “The email you entered is now confirmed.”.
That’s it! Your secondary email address is now set and confirmed.
How to remove a secondary email address
Log in to the marketplace.
Open your user settings panel (“Settings” from the dropdown under your photo/name).
Open the “Account” tab.
In the “Email addresses” section, remove the address by clicking the “X”.
Confirm that you want to delete the secondary email address.
Click “Save”.
Your secondary email address is now removed.
How to change a primary email address
Create at least one secondary email (see instructions above).
Make sure that the “new” primary email address can receive notifications (check the box under “Receive notifications” for this address).
Remove the email addresses that are no longer wanted (see instructions above).
That’s it! Your primary email address has now been changed.
How to export the emails and other details of your users to a CSV file
How to export the emails of your users
You can easily export the email addresses and other details of your users to a CSV file (that can be viewed in Excel) with the following steps:
Log in to your marketplace as an administrator.
Open your Admin panel.
Open the “Manage users” tab.
Click the “Export all as CSV” link in the top right, above the table.
The download will start automatically.
Note: only administrators can export user information.
What does the users export file contain?
The export contains all the users of your marketplace (except users who have deleted their account) and their emails, along with some other data. Here are the columns of the file explained:
user_id: the unique technical id of the user,
first_name: the first name of the user,
last_name: the last name of the user,
display_name: the display name chosen by the user,
username: the username of the user,
phone_number: the phone number of the user,
address: the address of the user,
email_address: the email address of your user,
email_address_confirmed: the status of the email address (true: email confirmed, false: email not confirmed),
joined_at: the date and time (UTC) when the user signed up,
status: the status of the user account (accepted: is a user in your marketplace, pending_consent: user hasn’t accepted marketplace terms yet, pending_email_confirmation: user hasn’t confirmed their email address yet, banned: banned by the administrator),
is_admin: the administrator privileges of your user (true: is an administrator, false: is not an administrator),
accept_emails_from_admin: choice of the user to receive emails from admins (true: it’s OK for the admin to send notifications or newsletters to this email address, false: you shouldn’t send notifications to this email address).
language: language selected by the user (example en is English, fr is French…).
can_post_listings: posting privilege of the user (true: user can post listings, false: user can’t post listings).
Note: as a user can have multiple emails defined in your marketplace, the same user can be listed on two or more rows: each row will contain a different email.
What is the export format?
You’ll be able to download a CSV (Comma Separated Value) file. This is a text file where all fields are separated by a comma. You can open that file with any text or spreadsheet editor (like Notepad or Excel). It is not encrypted or password protected.
Here are more technical details on the file format:
Fields are separated by the comma (,) symbol.
Fields are enclosed with the quote (“) symbol.
There is a header row.
File encoding is UTF-8.
What can you do with this data?
Lots of things! For example, you can:
Easily search for a specific user,
Import the data to a third-party email service like MailChimp,
See which of your users haven’t confirmed their email addresses yet, and approach them,
Store it to keep it as a backup,
…and more!
How to search and filter users in your marketplace user list
How to search for users in your marketplace admin panel
You should:
log in your marketplace with your administrator account
go to the Manage users tab
type your search criteria in the search bar: you can search by name, email, or display name
select some specific status that you want to filter by. The available statuses are: Accepted, Admin, Banned, Pending, Posting allowed, Unconfirmed
hit Search
That’s it! The list of users matching your criteria is now displayed
If there is a long list of users matching your search, you can switch to another page via the pagination buttons at the bottom.
How to view the full list of users in your marketplace
By default when you open the Manage users section, all accepted and banned users are displayed.
After a search, you can click the Show all button next to the Search button to display all users again.
How to get more information about your users
If you want to know a bit more about your users, you can always export your user list to a CSV file and find more information.
View unconfirmed and pending users, and resend the confirmation email
To be confirmed members of your marketplace, visitors have to sign up to create an account, accept the terms, fill potential mandatory fields and confirm their email address. If they don’t, they’ll be categorized as unconfirmed or pending.
How to find all unconfirmed or pending users
You can view them all in the “Users” section of your admin panel, and use filters to display only such users.
How to resend the confirmation email
If a member hasn’t confirmed their email address, maybe it’s because they’ve missed that email notification.
From the “Users” section, find the user and click on the “Unconfirmed” joined status.
From the popup displayed, you can resend the confirmation email.
That’s it!
How to ban or unban a specific user user from your marketplace
In some cases, the ban is the only way to deal with some users. It is possible to ban or unban a specific user from your marketplace.
How to ban a user from your marketplace
Log in to your marketplace as an administrator.
Open the “Manage users” tab in your admin panel.
Check the box in the “Ban” column next to the user you want to ban.
Confirm the ban.
You can decide to unban a user if you want to. See below.
How to unban a user from your marketplace
Log in to your marketplace as an administrator.
Open the “Manage users” tab in your admin panel.
Click on the checked checkbox in the “Ban” column next to the user you want to accept again.
Confirm the unban.
What happens when I ban someone?
Banned users immediately lose access to your marketplace. They won’t be able to open marketplace pages, perform transactions or contact other users. Their listings are closed and their ongoing transactions are suspended. They won’t receive any automatic email from the marketplace anymore.
What happens when I unban someone?
When you unban someone they are again members of your marketplace. If the user had open listings when you banned them they will close and stay close even after you unban them. The user will have to open their listings themselves after they have been unbanned.
Can a banned user rejoin my marketplace?
Not unless they use another email address. Users with the banned user’s email address will no longer be able to join your marketplace.
Are banned users counted in the user count?
No, only accepted users (users who have confirmed their account and accepted your terms) are counted there, so banned users are not. If you have 1234 users and ban one, your new user count will be 1233.
How users can delete their user account and personal information
How to delete your user account
You can delete your account from your personal settings:
Log in to the marketplace.
From the top bar, click on the profile picture and choose Settings.
Open “Settings” and switch to the “Account” tab.
Follow the instructions and click “Permanently delete my account”.
What information is deleted when a user account is removed?
When a user decides to delete their account, all of their personal information (such as name, phone number, address, email, profile picture, payout details, etc.) are removed. All the listings created by the user will be removed as well.
Interactions with other users (such as conversations with other people, transactions, reviews given to others, comments, etc.) are not deleted. However, the username will no longer be displayed next to this content. The username will no longer be available to use.
Is it possible to delete a user account at any time?
A user can’t delete their account if they have pending transactions. As soon as all transactions are completed, the user account can be deleted.
Is it possible to recover a deleted user account?
Recovering a deleted user account is not possible. Delete your account with caution!
How does the “Follow” feature work?
How to follow another user?
Following another user requires having an active account in the marketplace. It then only needs a few clicks:
log in with your account,
open the profile page of the user you want to follow,
under the profile picture, click the “Follow” button.
The button now says “Following”: that’s it!
How to unfollow another user?
You can easily stop to follow another user:
log in with your account,
open your profile page to view all the users you follow,
under the profile picture of the user you want to unfollow (or from their profile page), click the “Unfollow” button.
That’s it!
How to view the users I follow?
You can view all the users your follow from your profile page:
log in with your account,
from the top bar, click “Profile” in the dropdown under your name,
view the followed users from the section in your profile.
What are the notifications sent with the “Follow” feature?
Each time a user you follow posts a new listing, you’ll receive an email notification.
You can also disable those notifications from your user settings.
Users don’t receive a notification when someone starts to follow them.
How user review and ratings work
Trust between sellers and buyers is critical for the success of a marketplace. One way to build trust is to let users review and rating each other after a transaction. This is how trust is built with Tiger.
How to enable reviews in your marketplace
Reviews are enabled for all marketplaces. Users are prompted to rate and review the other party automatically after each paid transaction. It is currently not possible to disable reviews and ratings.
How do reviews work?
After a transaction is completed, both buyer and seller can review each other. A review consists of:
A positive or negative rating (thumbs up or down).
A free-form text comment.
Can users skip the feedback process?
Yes, users can choose not to review the other party. However, they can’t refuse a review from the other party after a completed transaction.
Where do reviews appear?
Reviews are visible to everyone on each user’s profile page. A seller’s rating (percentage of positive ratings and number of ratings) is also shown on each listing page.
As an admin you can also view the reviews in the “View reviews” section of your admin panel.
Can I enable reviews for free transactions?
Reviews are only available for paid transactions.
Is it possible to edit or delete reviews?
Yes, it is. Within the Reviews section of your admin panel, you can edit the feedback given by your users. You can decide to delete reviews and allow users to leave another one or block them to prevent them from leaving another one.
Automatic emails sent from the marketplace
Your marketplace is set up to send different types of automatic emails for different activities. This article explains what these are.
Automatic emails sent
Your marketplace sends several automatic email messages to your users for different actions they perform.
The automatic emails that are sent out to users are:
A welcome email when the user joins the marketplace
When someone sends them a message
When someone comments on an offer or request
When someone starts a transaction
When someone accepts an offer or request
When someone rejects an offer or request
When someone gives feedback
When the user has forgotten to confirm order as completed
When the user has to give feedback on an event
When someone marks an order as completed
When a new payment is received
How to change notification settings as a user
Each user can form their own settings change how often they receive the newsletter and which notification emails they receive. These can be changed under “notifications” in the user’s “settings”.
Each user can choose to receive or not receive the following emails:
When someone sends the user a message
When someone comments on the user’s offer or request
When someone accepts the user’s offer or request
When someone rejects the user’s offer or request
When someone gives the user feedback
When the user has forgotten to confirm the order as completed
When the user has forgotten to give feedback on an event
When someone marks the user’s order as completed
When The user receives a new payment
When someone the user follows posts a new listing
The message feature – Sending messages to individual users
This explains how to send individual messages to users.
Sending messages to individual users
All users can send each other messages. This can be done in two ways:
From the user’s profile (that they wish to contact) by clicking the “contact” button under their profile picture. OR
From the user’s listing through the “Contact” button to the right hand side. If a message is sent this way the listing information will be included in the message.
The message will be sent on the marketplace to the users marketplace inbox. The user will also get a notification to their email address informing them that they have received a new message.
Viewing the message received
The user can find all messages sent to them in their marketplace inbox. The inbox can be accessed from the upper right corner. If the user has unread messages there is a small notification on the profile image and on the inbox
From the inbox they can access, read and reply to the message.
-> For a new message to show the window need to be refreshed.
Viewing messages between users
Admins have the option to see all conversations between all users from under “View conversations”. If it is a monetary transaction the conversation can be found under “View transactions”.
Send email to (a part of) your users to communicate
There are many instances where you, as a marketplace operator, might want to communicate directly with all, or part, of your community. There might be important news you need to share, special offers that you want to make, or simply (but perhaps most importantly) you want to ask them for feedback on their experience on your marketplace.
If you wish to send messages to individual users we offer a messaging feature that you can use for this.
Tiger offers a way to do that directly from the Admin Panel. You can find this feature, called Send email to users, underneath the Users & Transactions section.
The feature itself is pretty straightforward:
select who you want to email
write the body
Click Send an email
Note that, to improve email deliverability, it isn’t possible to edit the Email subject or the first row of the email (First Name is automatically replaced by the actual user first name).
Remember that emails are not sent to users who have unsubscribed from all emails from admins, or who have been banned from your marketplace.
The selection part might warrant some explanation, and some example use cases:
All users: The name says it all. All users.
Users who are allowed to post listings: This segment is only available when you have enabled the option to allow only certain users to post listings. You can then send emails only to those users who have posting rights.
Users who have posted at least one listing: You can use this e.g. when you want to contact all of your providers who posted a listing so far, even if the listing is now closed.
Users who have posted at least one listing but haven’t added their payment details: If you are running a marketplace where you have enabled online payments, and you earn a commission, you want to contact these people to make sure that the transaction can actually take place.
Users who have added their payment details but haven’t posted a listing: Your so-called “sleeping” providers. They have gone through the trouble of setting up the payments, but something is stopping them from posting a listing.
Users who haven’t posted a listing and haven’t added their payment details: This group consists most likely of buyers only. There isn’t much to indicate that they would-be providers. Contact them to revamp their interest.
Welcome email
Each new user who signs up on your marketplace will receive a welcome email. The welcome email is a good way to welcome new users to your marketplace. You can for example take the opportunity to tell a bit about your marketplace and how it works.
How to edit the welcome email:
login your marketplace as an administrator,
go to the admin panel,
open the “Emails” tab,
click “Edit message” with the pencil icon at the top
add your text.
save by clicking the save icon in the upper left corner
The text is edited in the Mercury editor.
Keep in mind that different email providers can display your content a bit differently. Adding images or using the HTML editor should be done carefully.
The “First name” will be changed to the user’s first name when sent.
You can also send a test email to yourself by clicking the “Send test message” link to see how it looks.
The welcome email cannot be disabled.
Edit the welcome email on a multilingual marketplace
If you have a multilingual marketplace you can edit the welcome email for each language. To do this:
Switch to the language you wish to edit. Then click the “Edit message”.
Can users reply to this address?
Yes, anyone who receives an automatic email from your marketplace will be able to reply to it. Your users will sometimes try to contact you via this channel, so it’s a good idea to check it on a regular basis.
How to enable the comment feature in your marketplace
How to activate commenting in a marketplace?
To enable this feature:
log in as an administrator,
open the admin panel,
go to “Settings”,
in the “Listing preferences” section, check the “Allow users to post comments to listings (viewable to all other users)” box,
save the settings.
That’s it! Users can now post public comments on all open listings.
Is it possible to delete or edit comments?
Marketplace administrators can delete any comment. Authors can delete their own comments.
Currently, it is not possible to edit comments.
Who can view comments?
Comments are visible to everyone in your marketplace. If your marketplace is private, they are only visible to logged in marketplace users.
What can you do with the commenting feature?
There are lots of potential ways to use the commenting feature:
Use it to simulate auction functionality, where people can post their bids on the specific listing.
Use it as a review system. This is especially useful if you’re not using Tiger Rentals online payment system, since in this case our normal user review system is not available.
How to delete a comment
If the “Allow users to post comments to listings” has been enabled for your marketplace from the admin panel, users can publish comments that are visible to everyone on listings. In certain cases, users and administrators may want to delete comments.
Remove a comment on a listing
Comments on listings can be easily deleted by administrators and by the comment author. Users who are not administrators are not allowed to delete other peoples’ comments.
To delete a comment:
login as an administrator or the comment’s author,
open the page where the comment was published,
next to the comment’s publication date, click the Delete button,
if you are sure that you want to delete it, click OK in the warning pop-up.
That’s it! The comment will be deleted immediately.
Is it possible to restore a deleted comment?
Currently, it is not possible to restore a deleted comment. For this reason, you should be careful when deleting comments as it won’t be possible to retrieve them once deleted.
Tiger- Payments and Transactions
Payment providers Tiger offers – Stripe and PayPal
Tiger offers Stripe and PayPal as payment providers. Enabling one or both of these lets you have online transactions on your marketplace.
Payment methods
With Stripe and PayPal users can pay on your marketplace with all major credit cards.
If PayPal is enabled the user can pay with their PayPal account and if Stripe is enabled payment with debit cards are also possible.
How to configure your Stripe account and get API keys for your marketplace
If you chose to enable a Stripe account in your marketplace, you’ll then be able to collect a transaction fee, providers will be able to receive money in their bank account and buyers will be able to pay by credit card.
To get it working, you’ll need a free Stripe account, get your API keys from Stripe and add them to your marketplace admin panel.
Follow the instructions closely and it will work smoothly!
Create and confirm your free Stripe account
Creating a Stripe account is free and you can delete it anytime. If you already have a Stripe account (for another project), it’s better to create a new one to avoid any interference.
Note that right now, once you have configured your Stripe account in your Tiger marketplace, you won’t be able to change it to another one. You can always update all details (bank account, account name…) in your Stripe dashboard but using another new account later isn’t possible for the time being.
Fill in the email and password fields, then create your Stripe account
Great! You can skip the first question by clicking “Skip to dashboard” and you now have to confirm your Stripe email to confirm your account.
Confirm your Stripe account
To confirm your Stripe email and account:
Check your email inbox and look for a confirmation email sent from Stripe (by support@stripe.com) named Confirm your Stripe email address!
Click the confirmation link in this email and log in with your credentials recently created
Yeah! Your Stripe account is now confirmed. You should now activate it to be able to receive money via this Stripe account.
Activate your Stripe account
As you will receive money from your users via your Stripe account, you have to provide some details such as your address and your bank account. This data is secured by Stripe and won’t be shared with anyone.
To activate your Stripe account:
Log in to your Stripe account and click the Activate your account link in the left menu
Complete all the fields according to the instructions and set Your website to your Tiger marketplace address when asked. It’s OK to activate your account as an individual, you don’t need a company ID. Stripe may review your account later but you are able to activate it immediately.
The activation form varies based on your country, so select that first!
Any doubt or question? Contact Tiger support.
Once completed, click “Activate account”.
Good job! Now you need to enable Connect in your platform so your sellers can add their bank details in their settings.
Enable Stripe Connect in your platform
Tiger uses the Stripe Connect features with Custom Accounts and you have to enable it to enjoy those features.
This step is important: without this step, providers will not be able to receive money and buyers will not be able to start any transaction.
To enable Stripe Connect:
Click the Connect left menu item.
Click the Get started button.
After a few seconds or the review process, you should see your Connect dashboard. From the left sidebar, go to Settings then Connect settings, at https://dashboard.stripe.com/settings
Make sure that Custom is enabled in the Account types section
Great! You now have to get your API keys and input them into your marketplace.
Get your API keys from Stripe and add them to your Tiger marketplace
API keys are some text strings that have one technical purpose: link your Tiger marketplace with your Stripe account, so you can manage payments in your marketplace.
First, get your API keys from Stripe:
Click “Developers” → “API Keys” in the left menu item.
Make sure that you are not using test data. If this is the case, switch the View test data toggle. Test API keys will not work in your Tiger marketplace.
Copy the value from the Publishable key row, from the Token column. It should look like pk_live_somelongrandomvaluelikeVqFze9etc
Paste that value in your Tiger marketplace admin panel, in the Payment system tab, in the Stripe section, in the Publishable key field.
Go back to your Stripe account, in the API tab, and click the Reveal live key token button.
Copy the value from the Secret key row, from the Token column. It should look like sk_live_somelongrandomvaluelike0Rx3jvetc
Paste that value in your Tiger marketplace admin panel, in the Payment system tab, in the Stripe section, in the Secret key field.
In your Tiger marketplace, click the Save Stripe API keys button
Stripe should now be connected and confirmation should appear.
That’s it! You have now connected your Stripe account and are ready to receive payments in your marketplace!
You now have to set your transaction fee (commission) and possibly add a minimum transaction fee.
How to connect your PayPal account to your marketplace
As an administrator of your marketplace, you need to connect your PayPal account to your marketplace before your sellers can connect their PayPal accounts. Your sellers need to connect their PayPal accounts before anyone can make purchases from them. The process is similar for both administrators and sellers.
Administrators need to connect their PayPal account in order to be able to accept the transaction fees from transactions made in the marketplace. Sellers need to connect their account in order to receive the money from purchases.
If you are an administrator of the marketplace and also a seller, you need to connect your PayPal account twice: from the admin panel (as the administrator) and from your personal settings (as a seller).
How can an administrator connect their PayPal account?
Administrators can connect their PayPal account from Admin -> Payments. Simply enter your PayPal account email address and click the “Connect PayPal account” button. You will be taken to PayPal where you need to log in and give Tiger permission to make payment operations on your behalf.
How can a seller connect their PayPal account?
Sellers can connect their PayPal accounts by clicking their name from top bar -> Settings -> Payments.
Sellers must have a Business account at PayPal and you can learn more about this right below.
What kind of a PayPal account do you need?
Administrators and sellers need a PayPal business account. This is required in order to process credit card payments from non-PayPal users. If you don’t have a business account, upgrading your existing account or creating a new PayPal Business account is quick and free of charge. There are no additional costs involved.
To upgrade to a PayPal business account, go to www.paypal.com/upgrade. If you are an individual, just enter your own name when PayPal asks for a “business name”.
How can I view, search and edit the reviews left by users after a paid transaction?
After each paid transaction users are able to review each other.
Reviews appear on the user’s profile page and as an admin, you can also browse, filter and search them all from the “Reviews” section of your admin panel.
If the review is too long only the beginning of the review is shown in this section. If you want to see the whole review, you can visit the receiver’s profile by clicking on the receiver’s username.
How can I edit or delete reviews?
You can do it from the “Reviews” section of your admin panel. At the end of the review description there is an icon that allows you to edit the review. You can basically edit the “Grade” and the “Text” of the given reviews, in case someone left a wrong or abusive review. You can also add a “Grade” and “Text” to a transaction that is waiting for a review, in case, for example, of a user forgetting to leave a review.
You can also decide to delete the review or block it. If you delete the review, the user will be able to leave another review for this transaction. If you block the review, besides deleting it, the user will not be able to leave another review for this transaction.
Currencies supported for the online payment provider in a Tiger marketplace
The payment provider(s) that you can enable in your marketplace will depend on the country and the currency that you want to use.
In a Tiger marketplace, you can potentially use one of these currencies with the online payment system:
Australian Dollar, AUD
Brazilian Real, BRL
British Pound, GBP
Canadian Dollar, CAD
Czech Koruna, CZK
Danish Krone, DKK
Euro, EUR
Hong Kong Dollar, HKD
Hungarian Forint, HUF
Indian Rupee, INR (only supported for marketplaces within India)
Israeli New Sheqel, ILS
Japanese Yen, JPY
Malaysian Ringgit, MYR
Mexican Peso, MXN
New Taiwan Dollar, TWD
New Zealand Dollar, NZD
Norwegian Krone, NOK
Philippine Peso, PHP
Polish Złoty, PLN
Russian Ruble, RUB
Singapore Dollar, SGD
Swedish Krona, SEK
Swiss Franc, CHF
Thai Baht, THB
United States Dollar, USD
How to disable payments or add free listings to your marketplace
In some marketplaces, paid transactions may not make sense and should be disabled. Payments can be disabled for the whole marketplace, or only for certain order types.
How to stop using payments in your marketplace
Open your admin panel -> Order Types.
Click the Edit link next to the order type that you want to disable payments from.
Uncheck the “Allow sellers to accept payments online” box.
If you want to disable paid transactions for your whole marketplace, make sure that the above options is disabled for all available order types.
Click “Save”.
What happens to order types where payments are disabled?
When payments are disabled for a specific order type, the following apply for listings of that order type:
Users won’t be able to pay each other during the transaction.
Marketplace administrators will not be able to take a transaction fee from each transaction.
Transactions will be basic conversations.
Reviewing the buyer/seller is not available.
The availability management system is not available.
Is it possible to disconnect a payment provider?
Right now, it isn’t possible. If you have already connected and configured a payment provider in your marketplace, it isn’t possible to disable it. However you can always disable the online payment system according to the instructions above, but this won’t disconnect the payment gateway.
How to change the currency of your marketplace
Where and how to change the marketplace currency
You can change your marketplace currency from your admin panel, in the “Payment system” tab.
Once you have connected a payment provider, it isn’t possible to change the currency anymore. You can contact Tiger’s support for help.
How existing listings will be impacted by the currency change
Existing listings will retain their original currency until they are edited. You should advise your sellers to edit their listing to adapt their price to the new currency.
New listings will immediately use the new currency.
Choosing a minimum transaction size
If payments are enabled in your Tiger marketplace, you need to define a minimum transaction size—in other words, the smallest amount that an item can be purchased for. PayPal charges a fee for each transaction so does Stripe, and this fee always includes a fixed amount (for instance, in USD, PayPal’s minimum fee is $0.30). The minimum transaction size must be at least equal to PayPal’s and or Stripe’s minimum fee depending on if you have one or both enabled. Additionally, if you want to define a minimum transaction fee for your marketplace, it cannot be higher than the minimum transaction size.
Below is a list of the allowed minimum transaction sizes for different currencies:
ARS: 20
AUD: 0.5
BRL: 0.5
CAD: 0.5
CHF: 1
CZK: 15
DKK: 5
EUR: 0.5
GBP: 0.5
HKD: 5
HUF: 100
ILS: 2
INR: 50
JPY: 50
MXN: 5
MYR: 200
NOK: 5
NZD: 0.5
PHP: 20
PLN: 2
RUB: 15
SEK: 5
SGD: 1
THB: 15
TWD: 15
USD: 0.5
Collect a transaction fee (commission) from sellers, buyers or both
As a marketplace administrator, you can choose to charge a transaction fee from each paid transaction in your marketplace. The fee can be defined from the “Payment system” section in your admin panel. Depending on your payment gateway, you can charge sellers, buyers, or both.
What kind of transaction fees can I charge?
There are two options for transactions fees: you can either charge a percentage of the total transaction price or a minimum fixed fee. These can also be combined to charge both a percentage and a fixed fee. In this case, your commission is whichever is the highest option.
How does this work in practice?
As an example, let’s say you define a percentage of 10% and a fixed fee of $1. If the value of a transaction is $5, you will get a fixed fee of $1 since it is higher than 10% of the transaction value ($0.50). But if the value of the transaction is $20, you will get the percentage amount ($2) since it is higher than the fixed fee of $1.
Can I choose not to charge a transaction fee?
If you don’t want to charge a fee from transactions, you can always set both the percentage and the fixed fee at 0. Fees from the payment provider (Stripe or PayPal) will still apply.
Can I change the fee?
You can change your fee at any time. However, if you do so, it is a very good idea to notify your sellers to not create any unexpected surprises for them.
For any ongoing transaction, the fee will not change.
Can I set different transactions fees?
You can set up one transaction fee for Stripe and one for PayPal. The reason for this is that Stripe processing fees and PayPal’s processing fees and how they are charged differ.
With Stripe, you can decide to collect a commission from sellers, buyers, or both.
At this time it is not possible to set different transaction fees for different sellers categories or order types, unfortunately.
Can I charge a fee for creating listings?
This is not possible. A fee can only be charged for a paid transaction – a transaction fee.
How to disable Stripe or PayPal after it has been connected
Using only one payment provider, either Stripe or PayPal can be a good choice to improve the focus of your marketplace and simplify things a bit. If both Stripe and PayPal have been enabled, you can also decide to disable one of them.
How to disable a payment gateway, Stripe or PayPal
You should:
log in your marketplace with your admin account
go to the Payment system tab in your admin panel
Click Disable Stripe or Disable PayPal based on your preference
Read and accept the warning message if you want to move forward
That’s it! You should now contact your provider to let them know.
Note that if only one payment gateway has been connected in your marketplace so far, the best way to stop using payments is to disable the online payment system entirely.
What happens when a gateway has been disabled?
Immediately after you’ve disabled Stripe or PayPal:
providers can no longer edit or add their payment details in their user settings
providers payment details are not deleted so they can be restored if you want to enable the payment provider again later
buyer can no longer pay via the gateway you’ve disabled
ongoing transactions will continue as expected and won’t be stopped or closed
if providers had enabled only the payment gateway you’ve disabled, buyers can’t pay for their listing and they should connect their payment details for the other enabled payment provider, from their user settings
providers are not notified automatically of your choice to disable a payment gateway
How to enable again a payment gateway that has been disabled
From the same admin panel section, you can click the Enable Stripe or Enable PayPal button. It will be enabled immediately.
How to search transactions in your marketplace Transactions page
How to search transactions in your marketplace admin panel
You should:
log in your marketplace with your administrator account
go to the Transactions tab
type your search criteria in the search bar: you can search by transaction title, or parties involved
select some specific status that you want to filter by. The available statuses are: Canceled, Completed, Free transaction, Paid, Preauthorized, Rejected
hit Search
That’s it! The list of transactions matching your criteria is now displayed
If there is a long list of transactions matching your search, you can switch to another page via the pagination buttons at the bottom.
How to view the full list of transactions in your marketplace
By default when you open the Transactions section, all transactions are displayed.
After a search, you can click the Show all button next to the Search button to display all Transactions again.
How to get more information about your transactions
If you want to know a bit more about your transactions, you can always export your transactions list to a CSV file and find more information.
How to export the transaction information to a CSV file
Exporting the transaction information from your marketplace to a CSV file is a great way for you to analyze this information. You can download this data, import it into third-party software like Excel or Google Spreadsheets, and create tables and graphs out of it.
How to download your marketplace transactions
You can easily export the details of the transactions to a CSV file (that can be viewed in Excel) with the following steps:
Log in to your marketplace as an administrator.
Open your Admin panel.
Open the “View transactions” tab.
Click the “Export all as CSV” link in the top right, above the table.
The download will start automatically.
Note: only administrators can export user information.
What does the user’s export file contain?
The CSV file export contains the following information:
transaction_id : unique transaction identifier
listing_id: unique identifier of the listing that the transaction is related to
listing_title: the title of the listing that this transaction is related to
status: the current state of the transaction
currency: the currency of the transaction
sum: the total amount that the buyer paid for this transaction
started_at: the timestamp when the buyer started the transaction
last_activity_at: the timestamp of the latest message or status change
starter_username: the username of the buyer
other_party_username: the username of the seller
What is the export format?
You’ll be able to download a CSV (Comma Separated Value) file. This is a text file where all fields are separated by a comma. You can open that file with any text or spreadsheet editor (like Notepad or Excel). It is not encrypted or password protected.
Here are more technical details on the file format:
Fields are separated by the comma (,) symbol.
Fields are enclosed with the quote (“) symbol.
There is a header row.
File encoding is UTF-8.
What can you do with this data?
Lots of things! For example, you can:
Track how many transactions happen per week
Track your marketplace transactions growth
Find out who are the most important providers and buyers
Store it to keep it as a backup,
…and more!
How to read all conversations and transactions between your users in your marketplace
Your marketplace members can, in many occasions, discuss together. It’s a good idea to check what’s going on: you can then learn about your user behavior and offer help whenever its needed.
View all the discussion threads related to a transaction
Discussions related to transactions are started from the Checkout button* on a listing page. They can be:
discussions related to a paid transaction
discussions related to a free transaction
To browse these conversations:
Log in your marketplace and go to your admin panel
Open the View transactions tab from your admin panel
Click the status of a transaction to read more about a specific conversation
*The “checkout button” is the button in level with the listing’s image, you can choose the name yourself for it so it will be named different things on each marketplace, common names are “buy”, “book”, “request”.
View all the discussion threads related to a free conversation
Discussions related to free conversations are started from the Contact button on the listing page or a user profile. They are never linked to any payment.
To browse these conversations:
Log in your marketplace and go to your admin panel
Open the View conversations tab from your admin panel
Click the status of a conversation to read more about a specific thread
Let your users know
It’s a very good idea to remind your users (in your terms, for example) that marketplace administrators are able to view discussions related to transactions.
A conversation is not visible
If you cannot see a conversation you know have taken place take a look in both “View conversations” and “view Transactions”. It was most likely started from a different action than you thought.
Tiger- Listings
How to search listings in your marketplace Listings page
How to search listings in your marketplace admin panel
You should:
log in your marketplace with your administrator account
go to the Listings tab
type your search criteria in the search bar: you can search by listing title, author, or category name
select some specific status that you want to filter by. The available statuses are: Open, Closed and Expired
hit Search
That’s it! The list of listings matching your criteria is now displayed
If there is a long list of listings matching your search, you can switch to another page via the pagination buttons at the bottom.
How to view the full list of listings in your marketplace
By default when you open the Listings section, all listings are displayed.
After a search, you can click the Show all button next to the Search button to display all listings again.
How to view and manage all marketplace listings (open or closed)?
You can browse the list of listings from the “View listings” section in your admin panel. From there you can monitor the listing activity in your marketplace.
All the listings in your marketplace will appear in that section. You can find the:
listing title
author (and access their profile)
date it was created
date it was last modified
category it belongs to
status (open or closed)
You can also easily access the edit page if you want to update something in that listing.
Finally, you can sort the listing by creation or update date in order to easily manage them.
How to add and edit listing fields and filters
This article covers the following:
Create and edit listing fields
Listing fields types you can create
How to make a field mandatory to fill out
Create and edit listing filters (search filters)
How to delete a field and what happens when you do that
How to set fields for different categories
Create and edit listing fields
Listing fields are displayed on the page of a listing. There are a few predetermined listing fields from when you create your marketplace, some of these you can edit. In addition to these, you can add more. Some of the fields can be used as search filters.
To create a new listing field or edit one, you should:
log in your marketplace as an administrator,
go to the admin panel,
open the “Listing fields & filters” tab,
choose a field type from the “Add new field” dropdown or edit an existing one by clicking the pencil icon,
configure it and save.
The listing field will be created immediately.
You can create different types of listing fields:
Text: listing author can add some free text and links in this field. If you add a link to the text field, it will automatically be transformed into a clickable link on the listing page.
Number: listing author can add some numeric value in this field, you can decide to allow decimals or not and setup a minimum and maximum value.
Dropdown: listing author can select one value from a list you defined. (This is useful when a listing logically can have only one value for this aspect, e.g. size. A dropdown field creates a filter with “OR” logic, which means the person browsing can choose multiple values and all listings that have any of the chosen values are shown.)
Checkbox group: listing author can select one or more values from a list you defined. (This is useful when listing logically can have many values for this aspect, e.g. amenities or extra features. A checkbox group creates a filter with “AND” logic, which allows narrowing down the search as only the listings that have all the selected values are shown. )
Date: listing author can add a date via this field.
The listing field is added to the listing page and shows the value chosen during the listing creation form.
You can choose to make use of this listing field mandatory or not.
Each listing field can be enabled, or not, for a category or subcategory. When creating or editing a listing field, you can choose which categories or subcategories should offer this listing field.
Make a field mandatory to fill in
You can make a field mandatory to fill in by all who create a listing by selecting “Make it mandatory to fill in this field when creating a new listing”.
You can do this by:
log in your marketplace as an administrator,
go to the admin panel,
open the “Listing fields & filters” tab,
Click the pencil icon to edit the field.
check “make it mandatory to fill in this field when creating a new listing”.
save.
Create and edit listing filters (search filters)
To help your visitors browse your marketplace, you can create filters based on listing fields.
Fields used as filters in the image above (Price, number field, number field, dropdown).
Filters are available for the following listing field types: “Number”, “Dropdown”, and “Checkbox Group”.
Filters are not available for the following listing field types: “Text” and “Date”.
Create or hide a filter, based on a listing field on the homepage:
log in your marketplace as an administrator,
go to the admin panel,
open the “Listing fields & filters” tab,
open the listing field you want to manage,
check or uncheck the box “Display a filter based on this field on the homepage”,
Save.
How do I delete a field?
To delete listing fields, you should:
log in your marketplace as an administrator,
go to the admin panel,
open the “Listing fields & filters” tab,
Click on the “X” of the field you wish to remove
Click OK on the popup window
Make sure you delete the right one as the action cannot be reversed!
Not all fields can be deleted, for example, the image and location field cannot be deleted but you can make sure that they are not obligatory to fill in.
The pricing field cannot be deleted but if you have an order type without pricing it will not be used.
What happens when a field is deleted
When you delete a field it will be removed from all existing listings and will not show when you create new listings.
Can I display only filters related to a particular category?
Yes. Initially, all the enabled filters are displayed on the homepage of your marketplace. Once you select a category, you will only be able to see the filters that are related to that category or to a subcategory within that category. If you select a subcategory, you will only see the filters related to that subcategory.
How order types, listing types and pricing units work
Order types – a short explanation
Order types determine how the order process works in your site.
You can decide whether your users are for example renting or selling, or perhaps just posting announcements and communicating via free messages. You can freely choose which order types you have in your marketplace.
You can have as many order types as you like, which means that, for instance, you can have renting and selling in the same marketplace.
You can choose with which categories each order type is connected.
Order types are named “listing types” on the user side of the marketplace.
Pricing, Online transactions, and free listings
For each order type you can choose if:
you support online transactions – users being able to pay on your site,
you show the price but do not allow online transactions or
have free listings
Pricing units – part of the order type
For each order type, you can add one or more pricing units. They determine how the price is displayed. Examples include “per hour”, “per week” or “per ticket”. The price is then displayed as “$20 per hour”, for example. If pricing units are in use, the buyer can select how many items they want to buy (for instance, in a service marketplace, they might purchase a service for 2 hours, and in a ticket marketplace, they might purchase 4 tickets at once).
You can also choose not to have any pricing units in an order type. In that case, a flat price without “per” is displayed. Pricing units can (naturally) only be used if the price field has been enabled in the order type.
Order types – How to add or edit them
Order types show what your marketplace is offering, if it is selling, renting, giving away, a combination or something else. Order types determine the order flow on your marketplace as well as the pricing units available.
This article covers the following:
How to create and edit order types
Creating a new order type
What to think about when you create a new order type
What happens to existing listings when you edit order types
How to enable or disable online payments for an order type
How to change order type (listing type) for a listing
Different order types for different categories
How to delete an order type and what happens when you do
Enabling shipping for an order type
Edit the text on the checkout button for listings
How to add or edit an order type
To create a new order type or edit one, you should:
login your marketplace as an administrator,
go to the admin panel,
open the “Order types” tab,
choose a template from the “select a template” or edit an existing one by clicking the pencil icon,
configure it and save.
The order type will be created/changed immediately.
The order type will be used for all categories, if you wish to only use it for certain categories you will have to:
go to “Categories” in your admin panel,
edit the category you do not wish to use the order type with. You need to do this with all categories relevant,
save.
Creating a new order type
To create a new order type you should select a template from the “select a template” underneath the existing order types in your admin panel
We offer six predetermined order types you can choose from:
Selling products
Renting products
Offering services
Giving things away
Requesting
Posting announcements
In addition to these, you can create your custom order type by clicking the last option, “custom” to create your own.
What to think about when you create a new order type
When you create a new order type there are several things to take into consideration.
The first is to decide what order type or order types you should have on your marketplace. In many types of marketplaces only one is needed as you are only renting or selling but in others, you might use two or more order types.
When you have created the new order type you need to decide the following:
The order type’s name that the users and sellers will see
The text on the checkout button (the buy button on a listing). If you are renting bikes “rent” or “rent this bike” might make more sense than “buy” for example.
For many of the order types, you need to choose if you want to allow sellers to determine a price and offer online payments. If you do not offer online payments you can still show a price or show no price at all. If you only show the price or no price at all online transactions are disabled.
If you have enabled online payments you can choose shipping as an option. If shipping is enabled then a “pick up” option is also enabled.
If you wish to have a pricing unit or online payments but do not see an option for it you need to change the order type template.
What happens to existing listings when you edit an order type?
When you edit an order type all new listings created will use the new settings, however, open listings will not change.
To change an open listing you or the seller need to manually edit the listing by opening the listing and click “edit listing” and then click “Save”. By doing this the changes will be applied.
How to enable or disable online payments for an order type
With most order types online payment is enabled by default. However, for each order type, you can choose if you offer payment online, only showing the price or listings not showing a price.
By changing these settings you can decide if you have online transactions or not.
Can different categories have different order types?
Yes. When you edit a category, you select which order types are used in that category. When you add a new order type, it is assigned to all existing categories by default but you can change this for each category.
How to change order type for a listing
open the listing,
click “edit listing”,
at the top shows the order type (and category if you have any), click the order type and change it to the desired one.
If the order type is not available for the category currently selected you need to change the category first.
Click “Save”.
What happens when I delete an order type?
If you delete an order type any open listings within that order type will be closed. You delete an order type by editing it and clicking ‘“delete order type” in the bottom right corner.
If you wish to delete an order type but keep the listings open it is best to first change the order type for the existing listings to another one, before deleting it.
Tips: You can see all listings that belong to an order type by clicking “All listing types” on your marketplaces homepage and selecting the order type you wish to remove.
Enabling shipping for an order type
If you have the option “accept payments online” enabled for an order type you can allow the sellers to add a shipping fee to their listings. If this option is enabled the sellers can add a shipping fee and use the pickup as an option.
How to edit the text on the checkout button for listings
The text on the checkout button is determined by the order type used.
To edit it:
log in your marketplace as an administrator,
go to the admin panel,
open the “Order types” tab,
open the edit window for the relevant order type by clicking the pencil icon next to it.
edit the text under the “Checkout button label”
when done click “Save”.
Manage booking availability per day and per night
Tiger supports availability management for hourly, daily, and nightly bookings. This article is related to “per day” and “per night” options. When daily or nightly availability management is used, your providers can block or unblock dates in their listing availability settings, shown in the listing page by clicking “Edit availability”.
Whenever certain dates are booked, buyers cannot book the same dates any more, unless the provider decides to reject the initial booking, in which case the dates are freed. The provider cannot block or unblock dates from their calendar if there’s already a booking on those dates.
How to enable availability management?
You can enable “Per day” and “Per night” availability management by editing your order types in your admin panel.
How can providers enable availability management in their existing listings?
If your providers have existing listings when you enable availability management, those listings will retain their old settings, so availability management won’t be enabled by default.
To enable availability management, they need to go edit their listing, make sure they have an order type that has availability management turned on, and click save. When they do this, they should see a notification saying that availability management has been enabled.
How will automatic availability management look like to providers and customers
Customers will be see booked dates on grey background in the “From” and “To” date pickers when they’re initiating a booking. Those dates cannot be selected.
When Stripe is used as the payment gateway, end date cannot be further than today + 85 days as this is the maximum delay to hold funds.
How will transactions using availability will be marked as completed
When the availability is in use, transactions will be automatically marked as completed 2 days after the end date.
What are the limits of the availability management
If availability management is in use, customers cannot make bookings for more than one year ahead. With Stripe enabled, end date of the booking cannot be later than 85 days from now.
If a booking has been accepted by the provider, the booked dates cannot be freed even if the booking is cancelled.
Automatic availability management doesn’t currently support one listing having multiple seats. For example, if you have a booking platform for shared workspaces, where up to 5 people can book the same space for the same day, you should currently not use automatic availability management. For this you can use the pricing units per day or per night which also offers a calendar but less functionality.
We only offer the availability calendar on a daily/nightly basis, not on an hourly basis.
Availability management currently works only if online payments have been enabled.
How to change the category of a listing
Marketplaces have categories for different types of listings. The administrators of the marketplace can define and manage these categories from the Admin panel.
When users add new listings, they have to choose what category it belongs to. Once posted, users may notice that they chose the wrong category and want to change it. Here’s how to change the listing category.
Change the category of a listing
Open the listing page and click the “Edit listing” link from the right sidebar. Change the category by clicking the category name in the listing form. Once saved, the change will be active immediately.
The category can be changed both by listing creators and the administrators of the marketplace.
How to manage shipping/postage/delivery during a transaction
Shipping management
Two kind of shipping can be applied to listings: delivery (which includes a delivery fee) and pickup (no extra fee). The seller can choose the allowed delivery options: shipping, pickup, or both. If shipping is selected, the seller can define a shipping fee, which is then automatically added to the price upon purchase. The shipping address is collected automatically from the buyer when he makes the payment.
If you take a transaction fee in your marketplace, this fee only applies to the amount before shipping.
However, possible payment processing fees from the payment provider are taken from the total amount paid, including the shipping fee.
Address used in shipping process
When buyers go through the payment, they have to enter their address along with their payment method. This is the address shown to the seller.
How to allow only some users to post listings
This can be useful if you want to restrict posting only to trusted users or charge them a “Post a new listing fee”. If you are interested in charging users for post listings.
How to enable the “Only verified users can post a listing” feature?
This feature can only be enabled by administrators. To enable it:
log in your marketplace as an administrator,
go to the admin panel,
open the “Settings” tab,
go to the “Access preferences” section,
check the “Allow only users verified by admin to post new listings” checkbox,
click the “Save settings” button.
The feature will be enabled immediately.
How to grant posting privileges to a user?
If the feature is enabled, administrators can choose, for each user, if they can enjoy this privilege.
To grant the “Post a new listing” privilege to a user:
log in your marketplace as an administrator,
go to the admin panel,
open the “Manage users” tab,
browse the list and find the user you want to grant privileges to,
in the “Posting allowed” column, check the box,
wait a few seconds, this will automatically apply changes and confirm it with a pop-up notification.
That’s it! This user can now post listings.
Will the user be notified when they get posting rights?
The user will not be notified that they have posting rights. If you wish you can contact them to tell them that they have posting rights.
What happens if users who are not allowed to post listings try to do so?
All users can still try to post new listings but only the allowed ones will be able to do so. Others will see a message that you can customize by writing instructions (see below).
This instruction texts are a great place to give more details to your users on how this works and how they can earn that privilege (contact you, …).
How to write instructions to let users know about this restriction?
If the feature is enabled, administrators can write instructions that will be visible to users who try to post new listings but are not allowed to do so.
To write such instructions:
log in your marketplace as an administrator,
go to the admin panel,
open the “Instruction texts” tab,
click “Edit information”,
in the “Info text to non-verified users” section, edit the text with your own content.
How to post listings on behalf of another user
As an admin you might want to help your providers create their first listings or offer extra service of posting on behalf of providers. In other marketplaces, the target providers could not be very technical and might need help creating listings.
How to access the “Post listing as” feature
You can access the “Post listing as” feature in two ways.
Via the shortcut in the Users table in your admin panel
Log in to your marketplace with an admin account
Go to the Users section in your admin panel
Find the user you want to edit
Click the plus sign icon on their row
Via the user profile
Browse the user profile
Click the “Post listing as” button in the “Admin actions” section
Posting a listing on behalf of a user
By clicking “Post listing as” in the user’s public profile, you will access exactly the same form to post a new listing as you would normally access from the “+ Post a new listing” button.
You will notice that there is a banner indicating the name of the user on whose behalf you are posting a listing.
When the listing is created this way, the author will be the user.
That’s it!
How listing images (pictures) work
When a seller creates a listing, they can add pictures to the listing. The primary image is displayed on your marketplace homepage with the title of the listing.
Is there a limit to the number of pictures in a listing?
Nope.
A seller can upload as many pictures as they want for their listings, there is no limit.
Can I reorder the images once they are uploaded?
Sure!
You can simply drag and drop images when creating or editing a listing. This also works on mobile.
Listing image dimension
The listing image has the recommended size of 700×467 pixels.
Can I make images mandatory?
At this time it is not possible to make listing images mandatory.
Listing image is stuck in processing
This often solves itself after a couple of minutes. If it has not uploaded after a couple of minutes and you have tried to refresh the page contact Tiger support and provide the link for the listing and we will help.
How to embed YouTube videos to listings
Your users can embed YouTube videos to their listings: they will be automatically visible below the description.
What are the steps to add a YouTubevideo in a listing?
Embedding videos is easy. When posting or editing a listing, users can simply add a link to a YouTube video to the listing description and save the listing. Our system automatically recognizes YouTube links and embeds the videos under the listing description text.
The users are notified about this possibility in the new listing form, in an info text just over the description field.
Is it possible to add more than one videos in a listing?
Yes, it is possible to embed as many videos as the user wish to each listing.
Tiger- Managing your Tiger Marketplace
How to configure Facebook Login
In a Tiger marketplace, users can create a Tiger user account and log in using their Facebook account. When using their Facebook credentials, users don’t need to remember a separate username and password for Tiger. Their profile picture is automatically imported from Facebook.
When users create a marketplace account using their Facebook credentials, they need to grant Tiger permission to view their Facebook details. By default, users will see Tiger as the name of the app that is requesting these permissions. If you would like to show your marketplace’s name and logo instead, you will need to create a Facebook App and configure your marketplace to use this app instead. Creating a Facebook app is free. Follow the instructions below to set this up.
IMPORTANT! When creating a Facebook app for your marketplace, please do NOT add anything that is not specifically indicated in this instruction. Doing so, might create some issues and prevent your from finishing the setup. There are some fields that you may add optionally, like some specific URLs, but, in order to ensure a smooth app creation, it is better to add them after you have finished with the initial setup.
Create an account (you may have to register as a developer).
Make sure you are logged in.
Click on the “My Apps” drop down in the top right corner of the header, next to your profile picture.
Click “+ Add a New App”. A popup should appear.
Type your app Display Name. For example: “My Great Marketplace”.
Enter the contact email of your choice.
Click “Create App ID”. You may have to answer a security check.
Don’t select a Product or Recommended Product but instead…
… In the left hand menu, click “Settings” then “Basic”.
In “App Domains”, add all the domains from which you want the Facebook login to work, i.e. all your marketplace domains. If you are moving between a Tiger subdomain and your custom domain, it’s best to add both here to ensure that the Facebook login keeps working even when the domain changes. Add the domains without “https” or “www” or “subdomain”: – For your custom domain, the domain could be: “mygreatmarketplace.co” – For your Tiger subdomain (in a trial or Starter or Hobby plan), the domain could be: “mygreatmarketplace.happytiger.co”
Click “Add Platform”.
Select “Website”.
In “Site URL”, add your full marketplace’s URL with https and possibly www or the subdomain:
Click “Save Changes” at the bottom right. If you can’t save because the “App Domains” part complains about “This must be derived from Secure Canvas URL, Unity Binary URL, Site URL, Mobile Site URL or Secure Page Tab URL. Check and correct the following domains: (missing-domain-here.com)”, this is probably because you added two different domains while following the instructions above and only one is based on the current Site URL that you entered. The easiest way to overcome this limitation is to add a Secure Page Tab URL with following steps: – Click “Add Platform” – Select “Page tab” – In “Secure Page Tab URL” add the missing domain (mentioned in the earlier error message) with https.
You might also need to add your privacy policy URL (in some cases this is not needed). If so please add it by typing your complete URL followed by “/infos/privacy”:
Save changes if needed.
In the left hand menu, click “+ Add Product”.
In the list, find “Facebook Login” and click “Set Up” for it.
Select “Web” (www) in the list of options.
Verify that your “Site URL” is correct and click “Save” then “Continue”.
In the left hand menu, click “Facebook Login” then “Settings”.
Check that the following settings are correct: – Client OAuth Login: Yes – Web OAuth Login: Yes – Force Web OAuth Reauthentication: No – Use Strict Mode for Redirect URIs: Yes – Enforce HTTPS: No (if set to ‘yes’ without possibility to edit leave it as ‘yes’) – Embedded Browser OAuth Login: Yes – Login from devices: No
In the “Valid OAuth redirect URIs” field add your marketplace address followed by /people/auth/facebook/callback :
Check that the section “Deauthorize / Deauthorize Callback URL” is empty.
Click “Save Changes”.
From the top bar, turn the top switch from “OFF” to “NO” to make your app live.
Confirm the choice when asked. You may have to select a category and/or answer a security check. Your app doesn’t require an approval from Facebook so you don’t have to go through the submission process.
In the left hand menu, click “Dashboard”. Your app should be public (“This app is public and available to all users”) and a green dot should be displayed.
Your app is now created, configured and live. But this isn’t finished yet!
You now have to configure it in your marketplace to use it.
Configure your Facebook App in your marketplace
You’ll have to copy some information about your app from Facebook to use it within your marketplace. If you haven’t created an app on Facebook yet, please follow the instructions above.
In the left hand menu, click “Settings” then “Basic”.
Copy the value in “App ID”. It’s a long chain of characters (numbers and sometimes letters too).
Log in to your marketplace. You must be logged as an administrator.
Open the admin panel (“Admin” from under the “Menu” dropdown).
In the left hand menu, click “Social media”.
Find the “Facebook Login” section
In “Facebook App ID”, paste the value “App ID” you copied earlier.
Go back to your app on Facebook, in the “Settings” then “Basic section.
Click the “Show” button in the “App Secret” field. You may have to answer a security check.
Copy the value in “App Secret”. It’s a long string of letters and numbers.
Go back to the “Social media” settings in your marketplace.
Paste the copied “App Secret” string into the “Facebook App Secret” field.
Click “Save settings”.
That’s it! Facebook Login is now active and set! Users will now see your Facebook App’s details when they create an account or log in to your marketplace using their Facebook credentials.
You now should take a few more moments to customize your app on Facebook.
Customize your Facebook App
When users create an account or log in with Facebook Login for the first time, they will be asked to authorize your app. At this point, they will see your Facebook App’s logo. You should customize it to match your marketplace. Doing this helps users trust your app.
Open the app that you created via the “Apps” dropdown.
In the left hand menu, click “Settings” then “Basic”.
Upload your App icon in the correct section according to Facebook’s instructions.
Click “Save Changes” at the bottom right.
Customizing your social media sharing details
It’s a good idea to customize the way your website will look when it is shared in Social Media. By default, the title and description will use the marketplace name, slogan and description but you can change it to something else from your admin panel.
How to edit the title, description and image shared in social media
To edit your Social Media details:
go to your admin panel
go to the “Social media” section
edit the Social Media image, title and/or description
Save
That’s it!
How to preview how your website looks in social media
Reviewing how your website looks is important to make sure that everything looks good!
How to configure your marketplace’s Twitter handle
Listings on Tiger marketplaces include a Twitter share button. You can change the default username that is mentioned in the tweets sent from this button. Users can remove or change the mention before posting their tweet.
Configure your marketplace Twitter handle
If you haven’t created a Twitter account yet, you can do so at www.twitter.com.
Get your Twitter handle. It’s your account name without the preceding @.
Log in your marketplace as an administrator.
Open the admin panel.
Select “Social media” from the left hand menu.
Add your Twitter handle to the “Twitter handle” field.
Click “Save settings”.
That’s it! Twitter sharing should now include your username by default in your marketplace.
How to optimize your marketplace for search engines (SEO)
What is Search Engine Optimization(SEO)?
Search engines (such as Google) are a natural way for users to find your marketplace.
In order to be able to be listed in the search results, your marketplace is indexed by the search engines. To improve your listing position, there are a few things you can do to help. These actions are called Search Engine Optimization (or SEO).
SEO in your marketplace
Your marketplace is developed using SEO best practices. Common tags (such as description or title) are automatically added to each page and you can customize them according to your strategy.
The default values are relevant for most websites so you can focus on improving your social presence and getting more inbound links, for example. However, it’s always a good idea to customize them to make your tags unique.
It is also possible to add more meta tags by using our custom script functionality.
Resources to improve your search engine ranking
SEO isn’t only about code-related changes. It is also heavily dependent on link building and social media activity. Moz (among others) provides lots of great resources to learn more about SEO to help your with your SEO strategy.
Another good tool to use is Google Search Console (Webmaster Tools). It will tell you how Google sees your website. Read the how to add the GSC verification tag knowledge base article for setup instructions.
How about the robots.txt and sitemap.xml files?
Robots.txt and sitemap.xml help search engines index your websites. Learn more about them from these knowledge base articles:
robots.txt
sitemap.xml
You can find direct links to them in the SEO section of your admin panel.
How to make sure your marketplace is not indexed
If you prefer to keep your content not visible in search engines, you have two options:
set your marketplace as private
add a meta tag to advise search engines not to index
To achieve the second option, you should:
go to the Design section of your admin panel
in the Custom Script field, add
It will then be applied to all pages.
How to customize meta tags for SEO purposes
How to rank high in Search Engine Result Pages?
To rank high in Search Engine Result Pages, it’s a good idea to optimize your meta tags.
Optimizing meta tags of your marketplace pages is important to for usability and SEO (Search Engine Optimization).
How to edit meta tags
You can edit them from your admin panel:
Go to your admin panel
Go the the “SEO” tab
For each section, you can edit the default tags
Save
That’s it!
Right now, you can edit the meta tags for the:
homepage (or Custom Landing Page)
Search results page
Listing pages
Category pages
Profile pages
Why is there not “keywords” tag? Because it has been confirmed as useless for many years, from Google and other search engines. You should not use it unless you need it for something very specific.
You can also use variables when writing your own tags: they will be replaced with the actual value, on each page:
{{marketplace_name}}: the marketplace name
{{marketplace_slogan}}: the marketplace slogan
{{marketplace_description}}: the marketplace description
{{keywords_searched}}: the keywords that were typed in the search field (if enabled/available)
{{location_searched}}: the location that was typed/selected in the location search field (if enabled/available)
{{listing_title}}: the listing title
{{listing_author}}: the listing title, according to the Display name preferences
{{listing_price}}: the listing price + pricing unit (for example “20€ per person”)
{{category_name}}: the category name
{{user_display_name}}: the user display name
Not all variables are available for all pages, you can refer to the info text in the SEO section in your admin panel to learn more.
What are best practices for meta tags?
The default tags are relevant for most websites, but it’s always important to customize them based on your SEO strategy.
It’s a good idea to write concise, relevant and short content in these tags. Moz has great content and recommendations about this at https://moz.com/learn/seo/on-site.
Note that you can’t add HTML content into your tags content.</span
How to see how it will look like in Google?
You can use a service such as https://metatags.io/ to see how it will look like.
What about tags for social media?
You can also customize your social media sharing details if you want to. Have a look!
How to change the layout, edit texts or add custom scripts in your marketplace
How to edit and change aspects of your Go marketplace. Using CSS or JavaScript to change the layout and add features to your Go marketplace.
Administrators can add custom CSS or JavaScript to marketplaces. With this feature, you can customize the way your marketplace works or looks, and can add third-party scripts (such as the Google Search Console verification or a Facebook tracking pixel code).
Custom scripts are added to the tag of each page in your marketplace.
Custom scripts are active on all pages, for all users (whether they are logged in or not). Custom scripts are not active in pages of the admin panel.
This feature can be dangerous and should only be used by administrators who know what they are doing. In a worst-case scenario, your marketplace might be unable to load and be unavailable for users. Some technical knowledge is required to write custom code.
NOTE: Modifications made with custom scripts might break with page layout changes. As custom scripts can modify any part of the page, we have no way to guarantee that it will continue to work when changes are made to our platform. Keep this in mind and use this with caution.
Due the reasons mentioned above, custom scripts should only be used carefully. If you’re trying to change the way we work, we’re always listening to ideas, so contact us!
Add a custom script
Log in to your marketplace as an administrator.
Open the admin panel.
Open the “Design” tab.
Paste your script into the “Custom script” text box.
Click “Save settings”.
That’s it—our custom code is now active and set! Changes are applied immediately.
Find help to write your Custom Script
If you don’t have technical knowledge yourself, you can hire a freelancer or company. Any person with HTML, CSS and JavaScript skills would be able to help.
You can find great people with such skills on websites such as Upwork.
Custom script field size
The custom script field content is stored into a MySQL database in a TEXT field type. This means that the allowed size for this field is roughly 64 Kilobytes (or about 65,535 characters). This can vary a bit because of encoding though.
If you plan to add longer scripts, you should consider hosting them in a separate file on your own https server or file hosting.
Importing resources from third-party providers
For security purposes, we uses SSL certificates with the HTTPS protocol in all marketplaces. If you want to include files that are hosted on third-party sites, they need to be included over HTTPS as well.
What do to if your custom code breaks things
If the code you add produces errors, your marketplace may not work for users. If you are unable to fix the custom code, remove it to get things working again:
Log in your marketplace as an administrator.
Open the Admin panel.
Open the “Design” tab.
Remove all code from the “Custom script” text box.
Click “Save settings”.
How to use Google Search Console (Webmaster Tools) with your marketplace
What is Google Search Console?
Google Search Console is a great tool for SEO. These instructions will help you set it up on your marketplace.
If you want to verify your marketplace using Google Search Console (GSC) (previously named Google Webmaster Tools or GWT), you can do it by adding Google’s verification code as a custom script to your marketplace.
You can find a direct link to it in the SEO section of your admin panel.
What does the robots.txt file contain?
The robots.txt file for marketplaces allows Google (and other search engines) to index all pages of your marketplace. Some bots might be restricted for performance reasons.
You can find a direct link to it in the SEO section of your admin panel.
What does the sitemap.xml.gz file contains?
This compressed sitemap references up to the 500 most recent listings in your marketplace.
The sitemap file format is valid and works perfectly with all search engines (such as Google) bots.
What do I need to do to enable it?
You don’t have to do anything: search engines robots should find it automatically as it is referenced in your automatic robots.txt file. However, you could go the extra mile and declare it in Google Search Console.
How to make your marketplace private and what it means
Make marketplace private
If you make your marketplace private only registered users can see its contents.
For some projects, it’s useful to keep a marketplace private so visitors who are not users can’t view its content.
This is useful if you want to preserve privacy or keep your marketplace content “hidden” to the world.
What is a private marketplace?
If your marketplace is private, only logged-in users (users who have a confirmed account and who signed-in) can see the content (listings, …).
Users who are not logged-in will see the homepage where you can customize some content to explain the situation.
What are the impacts of making the marketplace private
If you set your marketplace as private:
unlogged users won’t be able to view the marketplace listings
sharing buttons on each listing pages (Facebook and Twitter buttons) will be disabled
Sitemap will be disabled
How to make your marketplace private
To enable the “Private” feature:
log in as an administrator,
open the Admin panel,
go to “Settings”,
in the “Access preferences” section, check the “Allow only registered users to see listings and user profiles (make marketplace private)” box,
li>save settings.
That’s it! This is active immediately.
You can now add some instructions texts visible to unlogged users.
How to edit content visible to unlogged user on the homepage for private marketplaces
It’s important to explain to visitors who don’t have an account in your marketplace yet or are not logged in why they can’t browse any content.
To write some content there:
log in as an administrator,
open the Admin panel,
go to “Instruction texts”,
click the “Edit information” button,
in the “Private marketplace homepage content” section, add your content,
save.
That’s it! This is active immediately.
You can use the “See how it looks.” link to get an overview of the result.
Customizing your social media sharing details
Add marketplace details
Your marketplace details (title, description, image) displayed when someone shares your website in social media can be customized.
It’s a good idea to customize the way your website will look when it is shared in Social Media. By default, the title and description will use the marketplace name, slogan and description but you can change it to something else from your admin panel.
How to edit the title, description and image shared in social media
To edit your Social Media details:
go to your admin panel
go to the “Social media” section
edit the Social Media image, title and/or description
Save
That’s it!
How to preview how your website looks in social media
Reviewing how your website look is important to make sure that everything looks good!
Find out how Jungleworks' products can help you set up & manage your online business
Have our business experts on the phone to understand your company's operations and guide you through a demo customized to your business industry.
We are trusted by the best in the world
Request a Free Demo
Our experts will contact you shortly
Step 1 of 3.
Explore our platform and launch your business with Yelo
Take a comprehensive walkthrough of the features and functionalities that Yelo provides, and learn how you can launch and grow your hyperlocal business.
We are trusted by the best in the world
Launch your Hyperlocal Business
Get started with Yelo Today
Your Theme has been SelectedIf you wish to proceed with this, the selected theme will be applied to your live account.
If that's okay, kindly Proceed Ahead.
Else you can Try the Theme Later as required from the theme section.
Try Later
Sign up for 14 days free trial.
Learn more about Yelo and its features during Yelo's 14 days free trial. You can set up your online hyperlocal store without coding and explore the platform on your own. Upgrade your plan only when you're ready.
Make the best of this opportunity, explore the platform before you pay.
Find out how Panther can help you expand your consultation business.
Build a community of doctors, lawyers, astrologers, fitness experts and many more with Panther. Connect with our business experts & get a demo customized to your business requirements.
We are trusted by the best in the world
Launch Your Consultation Business
Our experts will contact you shortly
Sign up for 14 days free trial
Learn more about Panther and its features during Panther's 14 days free trial. You can set up your online consultation platform without coding and explore it on your own. Upgrade your plan only when you're ready.
Setup your online consultation businessCreate an online presence for your business500+ Integrations100+ Payment Gateways
Start your 14 days free trial.
Make the best of this opportunity, explore the platform before you pay.
Find out how Yelo can help you expand your business.
Have our business experts on the phone to understand your brand's operations and guide you through a demo customized to your business industry.
We are trusted by the best in the world
Launch your Hyperlocal Business
Our experts will contact you shortly
Find out how Tookan can help you set up and grow your online delivery & logistics business
Connect with our product specialists to understand how the world's fastest-growing companies use Tookan to optimize deliveries.
We are trusted by the best in the world
Get in Touch
Our business experts will contact you shortly
Explore the Tookan platform for your business and get started today
Take a comprehensive walkthrough of the features and functionalities that Tookan provides, and learn how you can start managing your dispatch and delivery operations in a smoother manner.
We are trusted by the best in the world
Get Started for Free
Your online delivery platform is just one step away
Sign up for 14 days free trial
Learn more about Tookan and its features during the 14 days free trial. You can start managing your operations with Tookan without coding. White-label your platform or upgrade your plan only when you're ready.
Automate your delivery & logistics operationsOptimize routes saving time and cost45+ Free POS integrationsCustomized CSV support for bulk order creation
Start your 14 days free trial.
Make the best of this opportunity, explore the platform before you pay.
Thank you!
Our team will get in touch with you for the next steps, For questions or rush request please email contact@jungleworks.co
Our Product Specialist will get in touch with you for the next steps. Click on the button below to see how your website will look like.


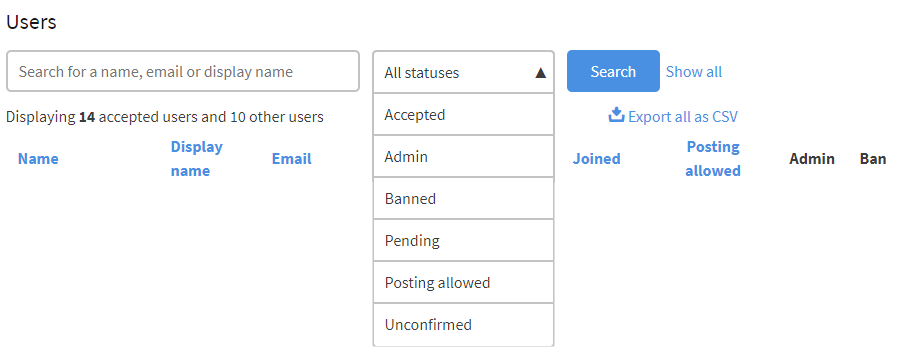
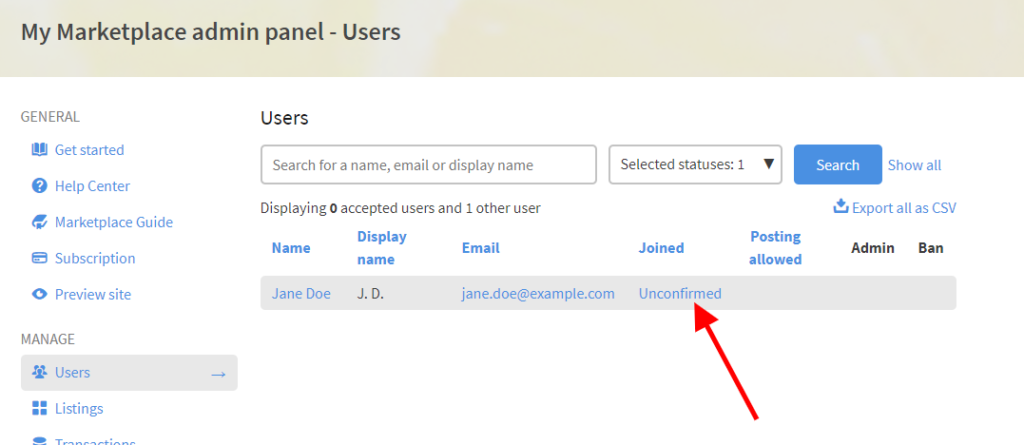
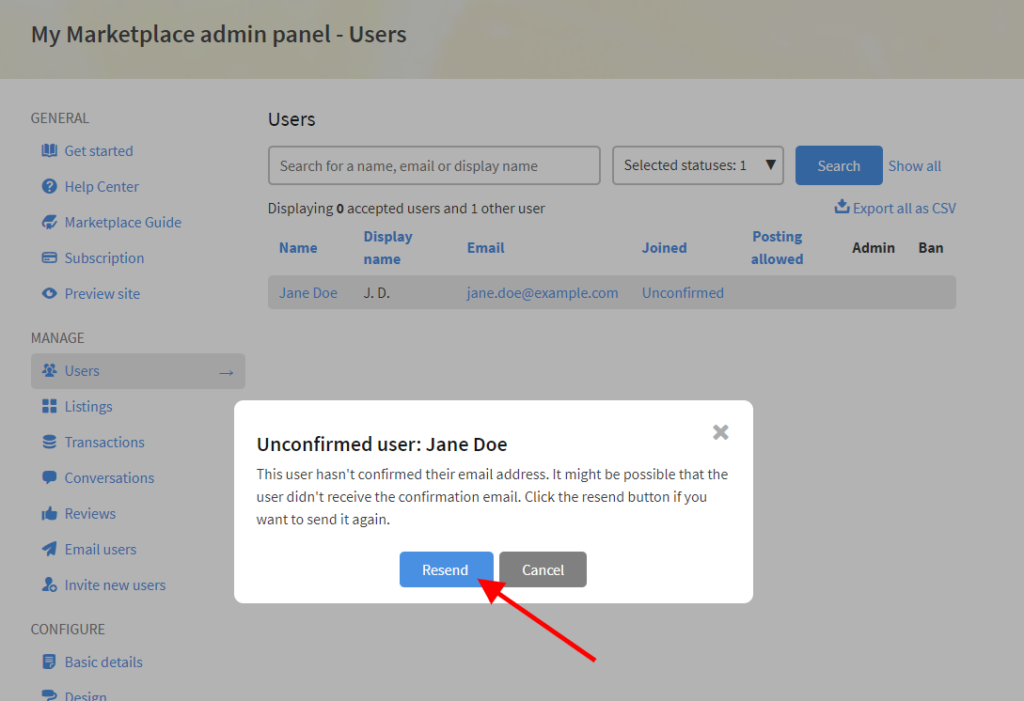
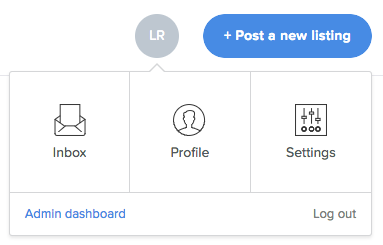
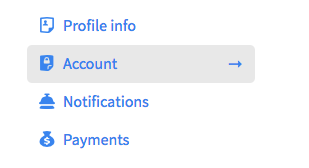
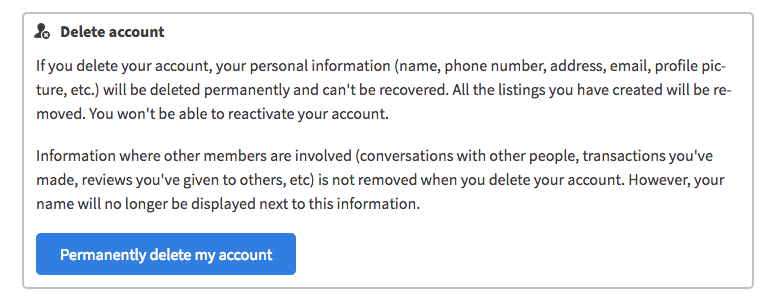
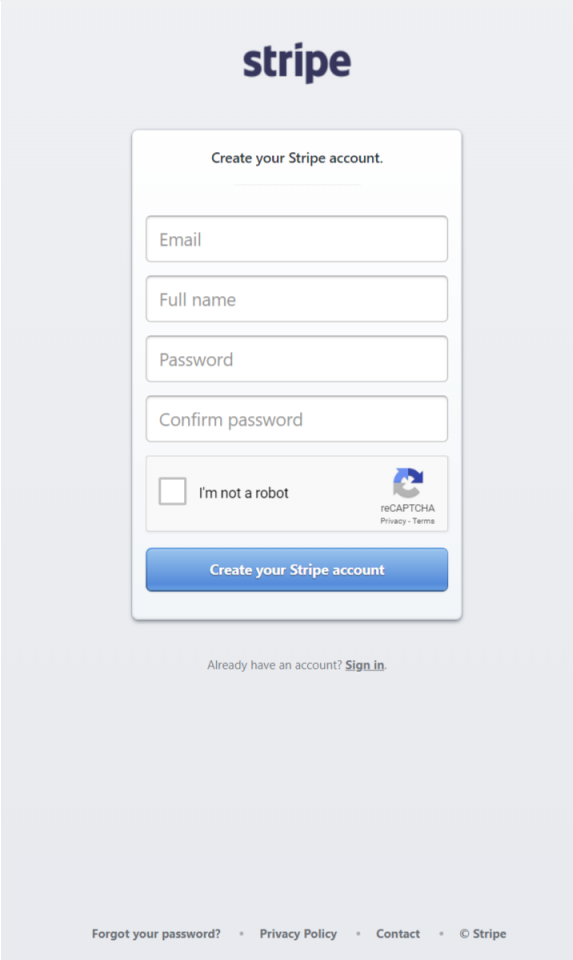
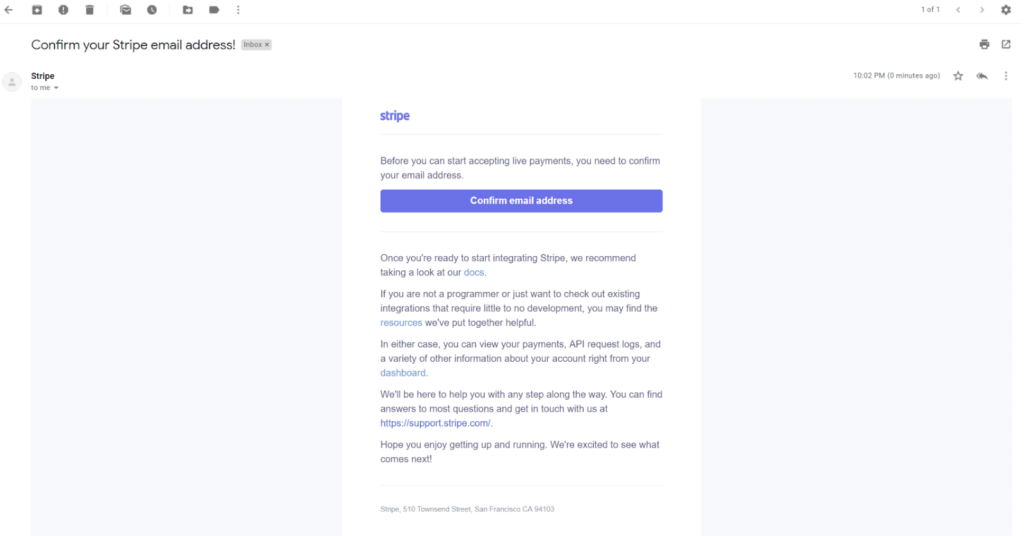
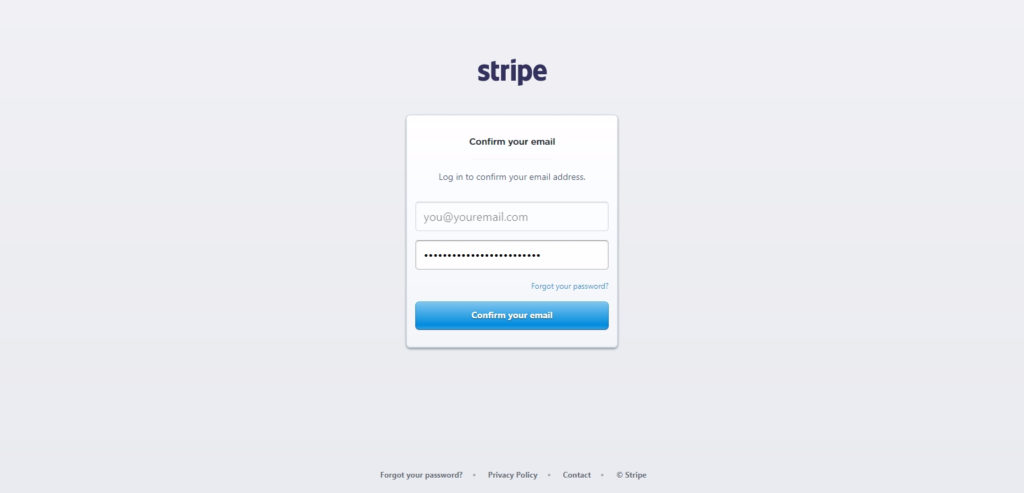
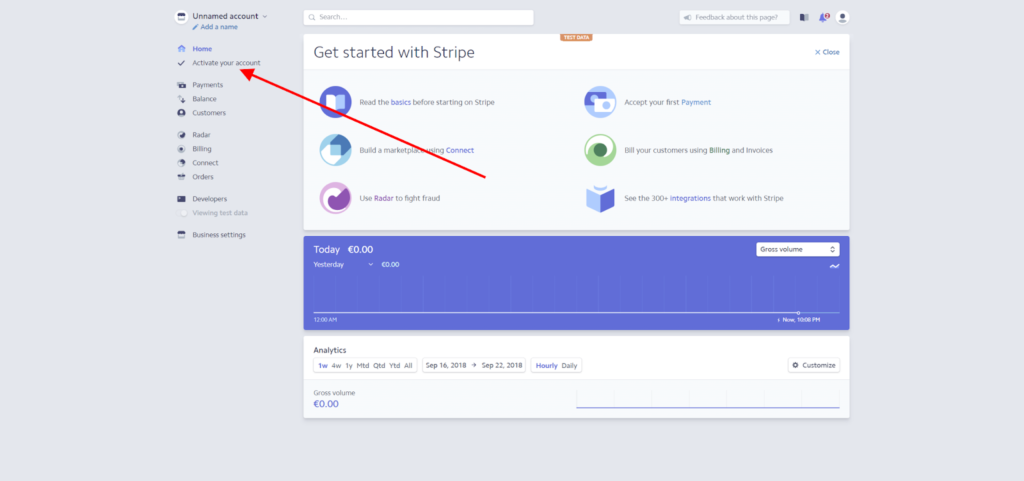


 Close
Close