-


- Industries
-
Ordering
Food Grocery Home Services -
Delivery & Dispatch
Pick Up & Delivery Courier Delivery 3PL Delivery Dispatch -
Consultation
Telemedicine Fitness Legal Consultation -
Mobility
Taxi Software App Like Uber Car Rental -
Customer Engagement
Conversational support WhatsApp Marketing Customer Acquisition -
Sales Engagement
Inbound Sales Pipeline Management Sales Performance Analytics
Explore All Industries
-
-
Learn
- Partner
- Pricing


Blog JungleWorks
Calling Banner — How to make an incoming call notification banner in Android using Service

In today’s modern world all of the technology is inter-connected digitally. So, are we humans, aren’t we? Well, in a way we are. In our busy lives we don’t get much time to travel places or go to our relatives who live far away from us. We can only communicate with them using our calling devices. The need of calling has almost reached at its peak at this time, this being the reason you can see that voice and video calls are being integrated in all of the communication apps and websites around the world.
Today we’ll see how we can create an incoming call banner in Android just like WhatsApp used to show it a few years back. We’ll use Android Service to do the handling part and display a notification banner for an Incoming Call.
Firstly, you’ll need something to decide when OS needs to invoke the service. Someway to know that someone is calling you, you can use either FCM or sockets to inform the device about incoming call. It’s totally up to you how you want to do that.
Creating the User Interface
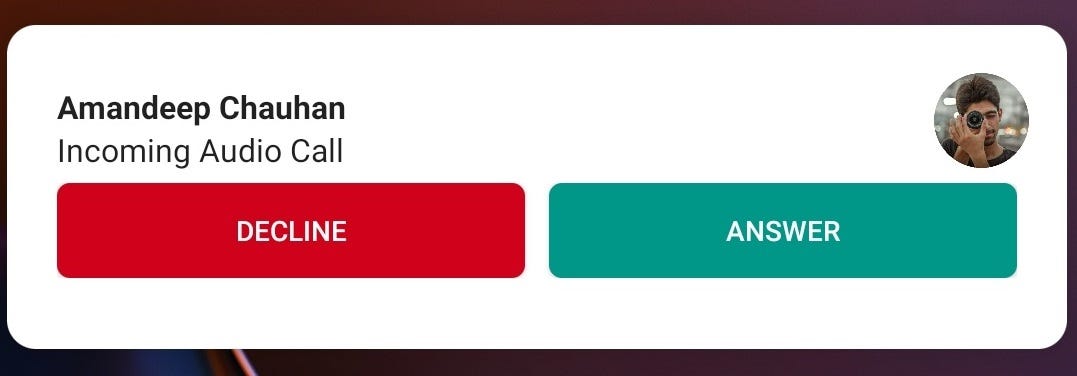
First, we will create our UI which we want to be displayed as a notification banner. I’ll name it as custom_call_notification.xml
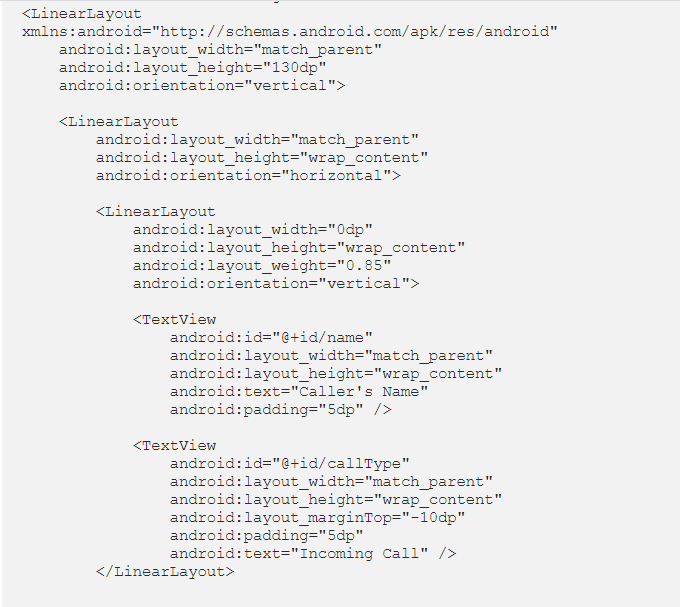
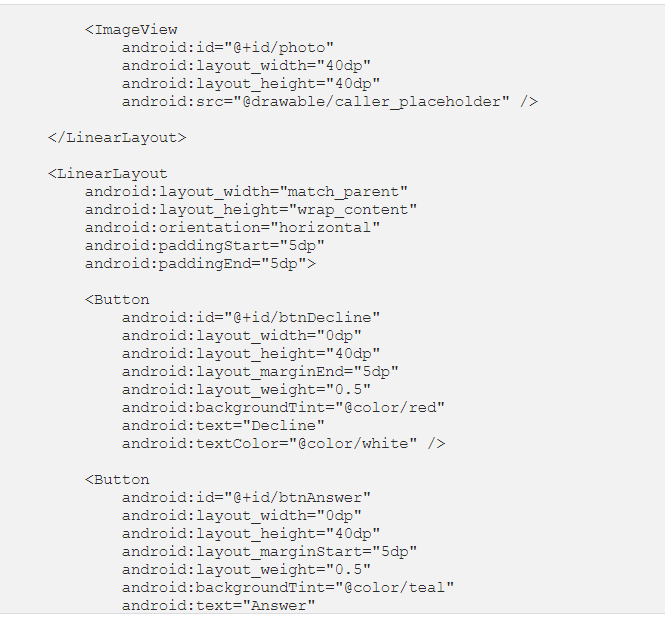
After we’ve created the UI, we’ll add some logic to manipulate it and make the UI meaningful. (Of course, the UI is at first meaningless if user can’t know who’s calling, duh). We’ll collect the data from our service intent and set it appropriately in our UI. But wait, where did the intent got data from? Well, we will put that data in our service intent before starting it. The data is already received in the FCM Data or via the Socket event.
Creating a Foreground Service
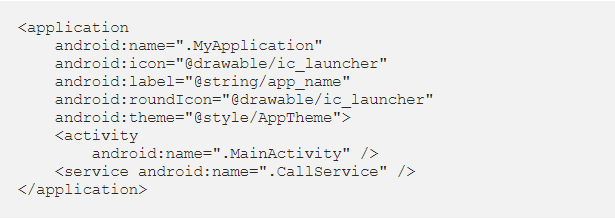
Create a new service class CallService which extends Service class and register it in your manifest.
Now inside the onStartCommand() of our Servicewe’ll handle our manipulation of UI and set action to our buttons. First, we’ll create a RemoteViewswhich we want to display.

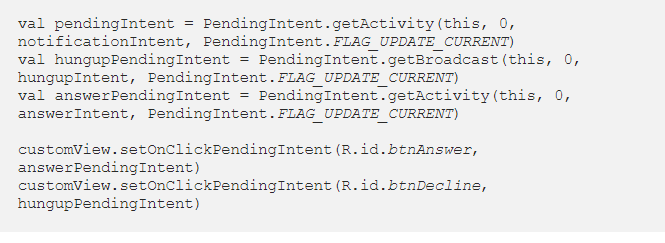
Now, we’ll create the action intents which we would want to start when clicked on the notification, answer button, or the reject button. All of the aftermaths is done inside these activities. CallingActivity is the full-screen activity displaying an incoming call. AnswerCallActivity is activity that will connect the user on call. HungUpBroadcast is simply a broadcast that emits the socket to the server so that server in turn can notify the caller that the user rejected the call.

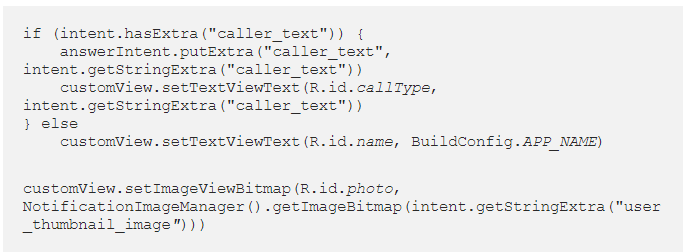
After we’ve handled the clicks of our views, we’ll retrieve the data from intent and set it in the UI making it meaningful to the user. In case the caller_text is not received from the intent; we will display our app name instead of caller’s name so it won’t look bad.
Now that we’ve set the data into our views, we will create PendingIntents of our action intents we previously created and assign them to the onClick of our buttons. Use flag PendingIntent.FLAG_UPDATE_CURRENT in order to update the existing notification banner in case your server emits the socket continuously, else user will face a new banner coming up every time new socket is received.
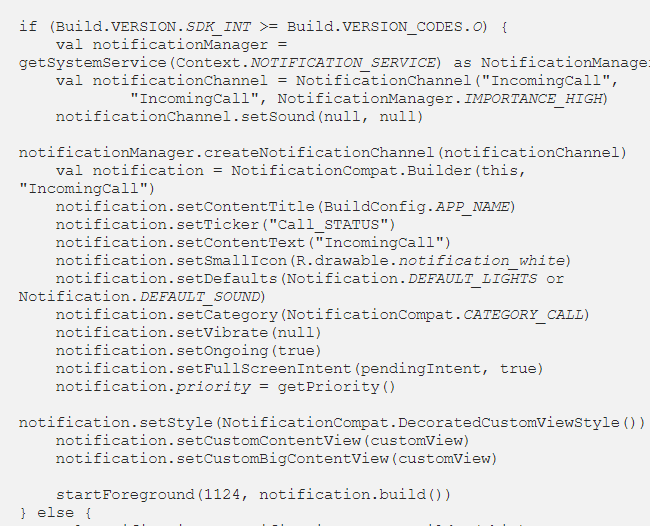
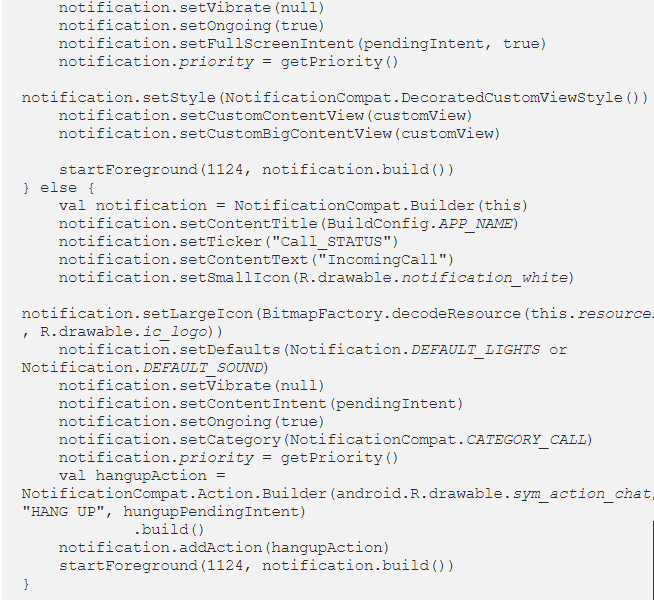
Our service is now ready to come in action and display the notification banner we just created. In order to display it as a notification banner we will create a new object of Notification class with the help of NotificationCompat.Builder and set our customView(the one we created above) as its UI and set our pendingIntent as its Full Screen Intent.
That’s it. Now whenever this service is started, user will see that incoming call banner and can click on it to see full screen calling activity.
Author: Amandeep Chauhan
Visit the link to read more from https://medium.com/@amnd33p
Subscribe to stay ahead with the latest updates and entrepreneurial insights!
Share this article:


Subscribe to our newsletter
Get access to the latest industry & product insights.
You may be interested in these articles
-
Jungleworks21st January 2025
How Dark Kitchens Are Changing the Face of the Food Delivery IndustryEver heard about Dark Kitchens? No, no, it’s not some mysterious kitchen.. [..]Read story
-
Jungleworks15th January 2025
Why Proof of Delivery Is Crucial for Logistics and Customer TrustHave you ever faced the frustration of ordering something online, only to be.. [..]Read story
-
Jungleworks14th January 2025
Powering Growth: The Role of Technology in Enterprise SuccessIn today's fast-paced business world, technology is the engine driving growth.. [..]Read story
-
Jungleworks8th January 2025
How Route Optimization Can Reduce Delivery Times and CostsIn today’s fast-paced world, where customers expect quick and efficient.. [..]Read story